Over the past few months, I’ve been building out a wildlife setup that fits how I actually shoot here in Scotland. I’ve selected from the best Nikon Z lenses primarily for my Z8.
Most of my time has been spent walking — exploring woodland, open areas, and edges where you might come across something rather than plan for it. Light is often overcast, and wildlife is mainly seen during dawn and dusk, so the conditions aren’t always ideal.
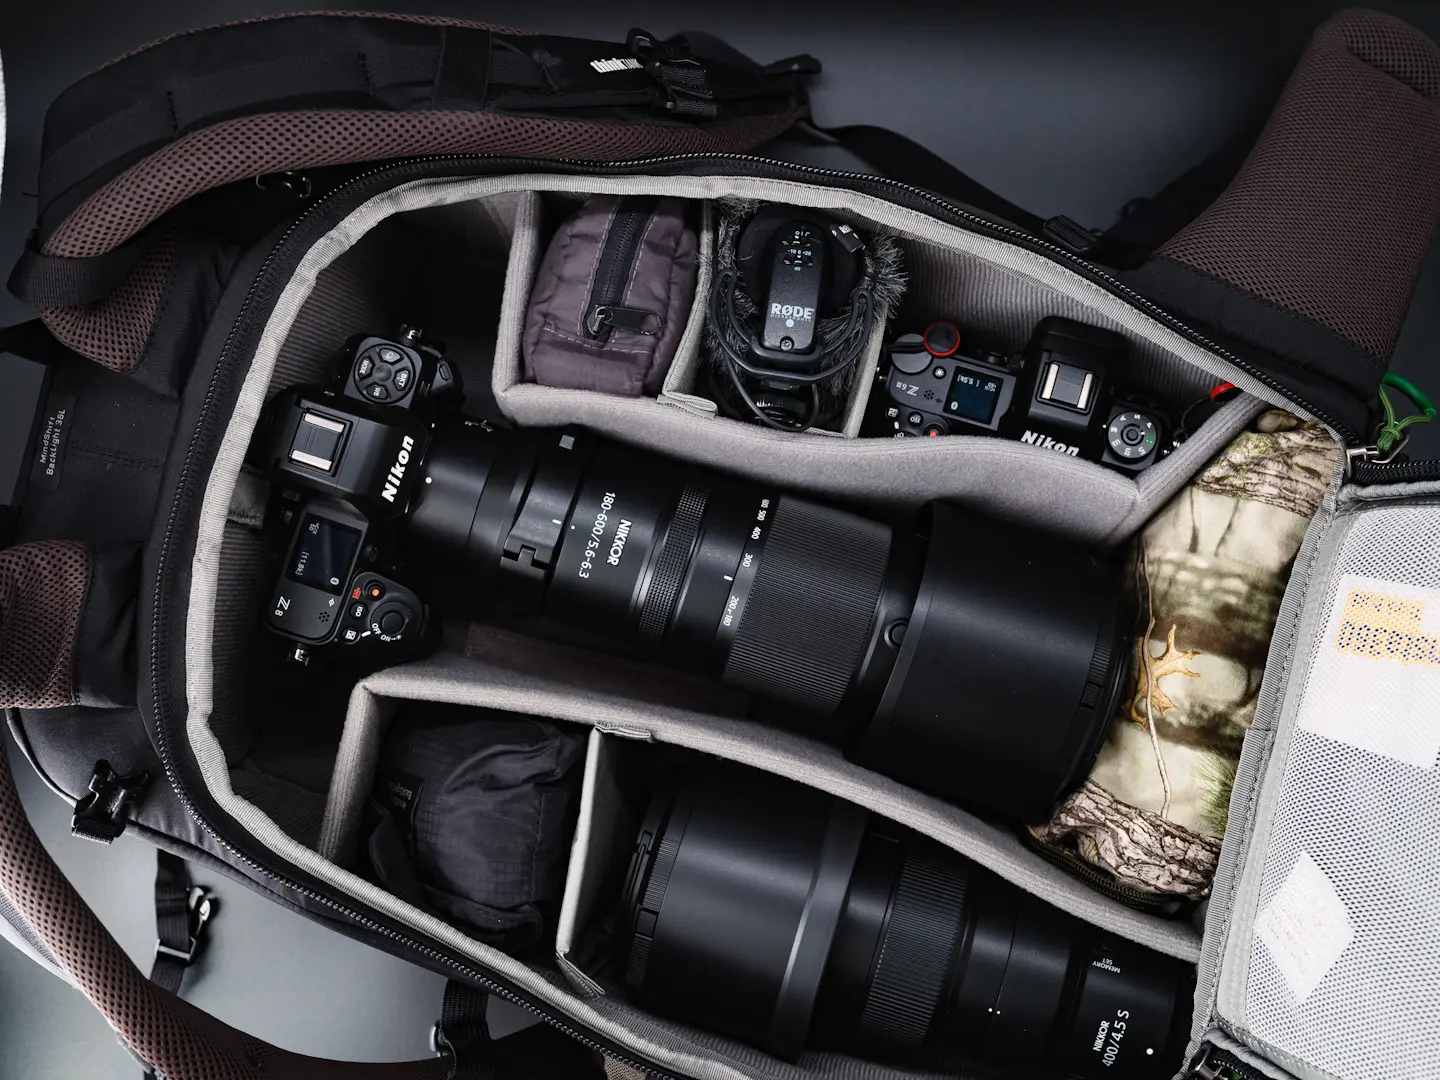
- Primary Camera: Nikon Z8
- Second Body: Nikon Z6 III
- Main Zoom Lens: Nikon NIKKOR Z 180-600mm f/5.6-6.3 VR
- Wildlife Prime: Nikon NIKKOR Z 400mm f/4.5 VR S
- Extra Reach: Nikon Z 1.4x Teleconverter
- Bag: MindShift BackLight 36L
- Tripod: Leofoto Summit LM-364C Tripod
- Tripod Head: Sachtler Ace XL II Fluid Head
Nikon Z8 (Primary Camera Body)
I chose the Nikon Z8 as my primary wildlife photography camera for several reasons.
The first was the lens ecosystem. I looked at various lens ecosystems from all the brands, and Nikon Z offers what I consider to be the best options for wildlife — from the Nikon NIKKOR Z 180-600mm f/5.6-6.3 VR through to relatively affordable and lightweight primes including the Nikon NIKKOR Z 400mm f/4.5 VR S, along with the 600mm f/6.3 and 800mm f/6.3 lenses. When I compared this to other manufacturers, it felt like the most well-rounded wildlife lens lineup across the full-frame options.
Initially, I considered whether to make OM System or Nikon my primary wildlife setup. After shooting both options here in Scotland — where light is often overcast and a lot of wildlife activity happens at dawn and dusk — the advantage of the Z8’s full-frame sensor became apparent, particularly when pushing into higher ISO.
The camera itself was the final part of that decision. The Z8 is a rugged, weather-sealed body with strong ergonomics, high-level autofocus and subject detection, fast burst shooting rates, and very capable video performance in terms of resolution and codecs. It’s a camera that feels like it’s built to handle real-world use rather than ideal conditions.
The 45MP full-frame sensor also gives me flexibility. Being able to crop into an APS-C frame (DX crop) while still retaining around a 20MP file means lenses like the 180–600mm effectively gain more reach, giving around a 900mm equivalent field of view while still keeping usable resolution.

So far, most of my wildlife shooting with the Z8 has been fairly casual — walking, researching potential areas, and taking shots where I can while getting my setup dialled in. That’s included refining my own technique and customising the camera so it operates in the most efficient way possible through button configuration.
I have to say, so far I don’t really have any complaints about the Z8. The way I have it set up makes it feel intuitive to shoot with. It allows the subject detection and AF algorithms to work to their maximum, while still giving me the ability to quickly override the camera if needed. I’ve gone into more detail on how I’ve set the camera up in my Nikon Z8 settings for wildlife photography article.
The subject detection has been excellent overall, but not infallible — particularly in woodland where there are busy backgrounds and foreground elements.
Nikon Z6 III (Second Body)
If I’m just heading out for a recce or a more casual session, I’ll usually just take a single body — and that’s usually the Z8.
But when I go out with more intention, which is happening more often now, I’ll always have the Z6III in the bag as a second body.
The way I use it is fairly straightforward.
I’ll typically have the Z8 with my chosen lens mounted on the tripod, and the Z6III will have an alternative lens attached. That gives me flexibility to shoot slightly different images without needing to swap lenses, or to grab something quickly handheld if the moment calls for it.
In practice, the Z6III complements the Z8 really well.
The autofocus performance is similar, and thanks to the custom setup I’ve put in place — particularly with button configuration and general handling — it’s pretty seamless to switch between the two. There’s no real adjustment period, which is important when things are happening quickly. I’ve gone into more detail on how I’ve set it up for wildlife in my Z6III settings article.
Where it is a bit more limited is flexibility.
With the lower resolution sensor, DX mode isn’t usable in the same way as it is on the Z8, so you don’t get that extra reach without sacrificing more image quality.
But as a second body, and at the price point, that’s a compromise I’m comfortable with at this stage.
Right now, it fits exactly where I need it to — a capable backup that adds flexibility without getting in the way.
Lenses
Nikon NIKKOR Z 180-600mm f/5.6-6.3 VR

I tend to pick the 180–600mm as my general wildlife lens when I’m heading out to explore areas where I think there’s potential. I documented one of those outings here.
Recently I’ve been carrying it on walks along the River Earn and up in the hills locally, and so far it’s proven to be a really flexible lens — especially given the price.

The zoom range is what makes it. I can shoot larger mammals like deer when I can get relatively close, then quickly zoom in — or switch into DX crop — and get up to a 900mm equivalent field of view for smaller or more distant birds. In real-world use, that flexibility matters far more than anything else.
The build quality feels excellent. I carry it in my hand via the tripod collar most of the time, and aside from occasionally switching hands, I’ve found the weight and size very manageable for handheld use.

The internal zoom is a big plus. It keeps the balance consistent when shooting handheld and avoids the issues you get with extending designs —it’s much better than the old push/pull zoom on the Canon 100–400mm I used to own, which always felt like it was pulling dust into the lens. The zoom ring turns smoothly and quickly and having the control ring set to focus (default option) works pretty well for me when I want to manually focus.
Autofocus is quick — not quite as fast as the 400mm — but still more than capable. It’s been able to keep up with red squirrels darting through trees and small birds moving unpredictably.
Image quality is very good for what it is. It’s sharp through to around 550mm, then softens slightly out to 600mm. It’s not a dramatic drop, but it’s there if you’re looking for it.
It does accept the 1.4x teleconverter, but I’m not convinced by that combination yet. I’ll keep testing it, but so far it feels like more of a compromise than a clear gain.
Where it does struggle a bit is low light.
At f/6.3 on the long end, it’s not a low-light lens. I was walking along the River Earn the other evening, about an hour or two before sunset, and found myself shooting at ISO 12,800 while juggling shutter speed to try and keep things usable.
But that’s part of the trade-off. For the reach, flexibility, and price, it’s doing exactly what I expected — and so far, I’m very happy with it.
Nikon NIKKOR Z 400mm f/4.5 VR S

I bought the 400mm f/4.5 to handle the situations where the zoom struggles — mainly woodland and lower light. I wrote about scouting a new location along the River Earn using this lens.
The first thing that stands out is the weight. It’s surprisingly light for a wildlife prime, and in real use, that makes a big difference. It’s light enough that I can comfortably carry it on a strap (I use the Peak Design Slide Lite) rather than holding it by the tripod collar if I want.
It’s quicker to bring up, easier to carry for longer periods, and just feels less demanding overall.
Image quality is excellent. It’s noticeably sharper than the 180–600mm more of the time, and autofocus is a bit quicker and more assured.
Even though it doesn’t offer the same reach or flexibility on paper, I haven’t found it restrictive on the Z8. Being able to quickly switch into DX crop and effectively cover the 400–600mm range changes how usable a lens like this is.
Yes, you give up some resolution, but getting a 20MP file at that equivalent focal length is often more than enough.
This is one of the reasons I chose the Z8 — it makes primes like the 400mm f/4.5 far more flexible in real use.
It also seems to work better with the 1.4x teleconverter than the 180–600mm, at least from my early impressions.
The wider aperture helps as well. It gives a bit more subject separation when backgrounds are busy, which is useful in woodland where things can get messy quickly.
It’s not a miracle worker, and it doesn’t have the rendering of something like a 600mm f/4 — but it’s also a fraction of the price and size.
Supporting Gear
Nikon Z 1.4x Teleconverter

I’ve used the 1.4x teleconverter on a few occasions so far, mainly when I needed a bit more reach than the lens alone could give me.
One of those was shooting hares on local farmland with the 180–600mm. The results were mixed. There was definitely some degradation in image quality, but that test wasn’t entirely fair — the hares were at distance, and there was noticeable atmospheric disturbance as well.
I’ve also tried it on the 400mm f/4.5, and the results there looked much cleaner.
At the moment, it sits in an interesting place in my kit. It’s useful, and I’ll keep testing it, but I’m not yet convinced it’s going to become something I rely on regularly. In a lot of situations, switching into DX mode feels like the quicker and simpler option.
That may change over time, but right now it still feels like something I’m evaluating rather than depending on.
ThinkTank MindShift BackLight 36L

The ThinkTank MindShift BackLight 36L has quickly become my main camera bag now that I’m back in Scotland.
The biggest thing for me is how it carries weight. The waist harness makes a real difference when you’re walking for longer periods, and the overall design means I can carry a full setup without it becoming uncomfortable.

It’s also the only bag I own that can comfortably carry:
- Z8 with the 180–600mm attached
- 400mm f/4.5
- Z6III body
- 1.4x teleconverter and accessories
On top of that, there’s still room for things like a waterproof jacket and a drinks bottle, along with smaller items in the external pockets.
The tripod carry system is another big plus. It’s centrally located, so the weight stays balanced rather than pulling to one side like it does on a lot of bags. That makes a noticeable difference when you’re walking any distance.
Build quality is solid, with plenty of configurable dividers, and overall it just feels like a well thought-out bag.
What’s surprised me most is how often I take it, even on more casual walks. I’ll often carry just the Z8 or Z6III with a single lens, but still use the bag because it’s comfortable and gives me somewhere safe to store the gear if the weather turns.
Given how quickly conditions can change here, that alone makes it worth carrying.
Leofoto Summit LM-364C Tripod

I chose the Leofoto tripod because I needed something stable enough to comfortably support my heaviest setup.
It’s carbon fibre, which helps keep the weight down, but more importantly, it doesn’t feel freezing to handle in cold weather — something you notice quickly in Scotland.
The legs are thick and solid, and the twist locks feel very secure. I’ve used cheaper twist lock systems before and didn’t trust them, but these inspire a lot more confidence.
It extends to a good working height for me at around 145cm (I’m 6ft tall), and it can also go right down to very low angles at around 9cm, which gives a lot of flexibility depending on the situation. Add on to that the height of whichever tripod head I’m using and it’s a really flexible setup.
It folds down to 53cm, so it’s still manageable to carry, and at around 1920g it’s not overly heavy for what it is.
A few smaller details also make a difference:
- Rubber ball feet for stability
- A high-visibility spirit level
- Offset leg joints
- A changing platform system
That last one is particularly useful. I can switch between a flat platform for a ball head and a video bowl for the Sachtler Ace fluid head, which fits with how I want to shoot both stills and video.
With a max payload of 30kg, it’s more than capable of handling anything I’m likely to put on it.
Just as importantly, it offers strong value compared to similar options — it feels like a solid, reliable piece of kit without going into the price range of some of the bigger brands.
Tripod Head
Sachtler Ace XL II Fluid Head

My wildlife shooting at the moment is split between more casual outings where I’m shooting handheld, and more intentional sessions where I’ll use a tripod with the Sachtler Ace fluid head attached.
Using the tripod changes things straight away.
It allows me to stay in position for longer without fatigue, and when I do take shots, I’m more likely to get a higher keeper rate simply because the camera and lens are sitting on a stable base.
I know a lot of people use dedicated gimbal heads for wildlife photography, like those from Wimberley, but I chose the Sachtler for a different reason.
It gives me flexibility.
I can reduce the resistance on the head so it moves freely enough to track subjects for stills, and then increase that resistance when I’m shooting video to get smoother, more controlled motion. That dual use was important to me, as I want the ability to shoot video alongside stills.
In use, it feels very solid. It comfortably balances my heaviest setup and remains stable when mounted on the Leofoto tripod.
How I Actually Shoot Wildlife

At the moment, I’m still very much in the stage of discovering the local area and the opportunities that exist.
That means I’m doing a lot of local walks and leaning more towards casual shooting. I’m not heading out with a fixed plan every time — it’s more about exploring, seeing what’s there, and starting to understand how the land and wildlife behave.
Once I’ve identified more promising locations, that’s when I’ll shift towards more intentional shooting with the full setup.
But even at this stage, there’s still a purpose to what I’m doing.
I’m effectively shaking down the kit — making sure everything works as it should, refining how I use it, and getting comfortable with the setup so that when the time comes for more deliberate sessions, I’m not thinking about gear at all.
A good example of that was a location I found locally with strong potential for photographing hares.
I initially came across it on a casual walk with the Z8 and 180–600mm. A couple of days later, I went back with the full setup — bag, tripod, everything — to try and get something more intentional.
As is often the case with wildlife photography, it didn’t quite come together.
I couldn’t get close enough, even with the 1.4x teleconverter attached.
But that’s part of it.
I’ll go back again, and again, until it lines up.
That’s really what wildlife photography comes down to — light, distance, and subject all need to come together at the same time. There’s no real shortcut for that. You just have to keep returning to the same places and put the time in.
In terms of how I shoot, I’ve mostly been committing to one setup at a time in these early stages.
Rather than constantly switching between bodies and lenses, I’m focusing on learning the locations and understanding behaviour first. The gear supports that, but it’s not the focus.
Autofocus has been a big part of that process.
My custom AF settings are working very well now, and my keeper rate has improved noticeably since tuning them. Subject detection works well when animals are out in the open, but once you move into woodland with busy backgrounds and foreground elements, it becomes less reliable.
That’s where having a quick override to Single Point AF has been essential.
It gives me control when I need it, without having to fight the camera.
In terms of lenses, I’ve found myself preferring the 400mm f/4.5 in a lot of situations.
The autofocus feels a bit more assured, and the rendering is cleaner more of the time. But I still end up using the 180–600mm more often, simply because of the reach and flexibility it offers.
That trade-off comes up again and again.
Closing Thoughts
This setup will evolve over time. I can already see that eventually I will want a bit more reach and better low light performance at the long end but both of those come at significant cost.
Right now, it feels balanced. It gives me enough reach to work with, enough flexibility to adapt, and enough confidence that when something does happen, I’m not fighting the camera.
Most of what I’m doing at the moment is still about learning — the land, the light, and the behaviour of the wildlife here.
The gear plays its part, but it’s not the limiting factor.
Getting out consistently, returning to the same locations, and putting the time in — that’s what will make the difference.
Wildlife Photography Setup FAQ
A strong wildlife setup balances reach, autofocus performance, and low light capability. A full-frame body like the Nikon Z8 paired with a long zoom such as a 180–600mm gives flexibility, while adding a second body or a fast prime like a 400mm f/4.5 helps in more demanding conditions.
Yes, the Nikon Z8 is one of the most capable wildlife cameras available. It offers fast subject detection, high burst rates, strong weather sealing, and a 45MP sensor that allows effective cropping for extra reach without losing too much detail.
You don’t need one, but it helps. A second body lets you carry a different lens without swapping in the field, which can save time and prevent missed shots. It also acts as a backup if anything goes wrong.
For most situations, yes. A 180–600mm lens covers a wide range of wildlife, from larger mammals to distant birds. Combined with cropping modes, it provides plenty of reach, though smaller or more distant subjects may still benefit from longer primes or teleconverters.
Prime lenses typically offer better sharpness, faster autofocus, and wider apertures for low light. However, zoom lenses are more flexible, especially when distances to subjects change quickly. Many photographers use both depending on the situation.
A tripod is useful for longer sessions, heavier lenses, and improving stability, especially in low light. However, handheld shooting is often better for mobility when walking or reacting quickly to wildlife encounters.
A teleconverter can extend your reach, but it often comes with some loss in image quality and light. It works best on high-quality prime lenses, while on zooms it can feel more like a compromise depending on conditions.
In the UK, wildlife often requires longer focal lengths due to distance and cautious subjects. A range between 400mm and 600mm is ideal for most situations, with additional reach useful for birds and more distant animals.