The Nikon Zf is one of the most enjoyable cameras Nikon has made in years — full-frame image quality, strong autofocus, excellent IBIS, and a shooting experience that feels more deliberate and “photographic” than most modern bodies. It’s ideal for general photography and why it featured so highly in my best cameras for family photography article. But like every Nikon Z camera, it also has a deep menu system, and it can feel complicated when you first set it up.
In this guide, I’m going to give you the exact baseline settings I recommend for the Nikon Zf for general photography, travel, family moments, and everyday use. The core of this setup is based on the same approach I use on my Nikon Z6III — because Nikon’s autofocus logic and menu structure are very consistent across the Z system — but I’ve adapted the emphasis to suit the Zf’s more minimal, dial-led shooting style.
For a broader look at how this camera compares within the system, see my guide to the best Nikon Z camera for photography.
If you’re building out a Nikon Z kit, I’ve put together a full, experience-led guide to the best Nikon Z lenses based on real-world use.
My goal is always the same: keep things simple and logical, with essential settings available quickly and everything else out of the way. If you’ve just bought your Nikon Zf and want a reliable starting point you can trust, the settings below will get you there fast — and you can tweak them later depending on what you shoot. Once you have dialed in these settings, to get the most out of your camera, these are the best accessories for the Nikon Zf that I actually use.
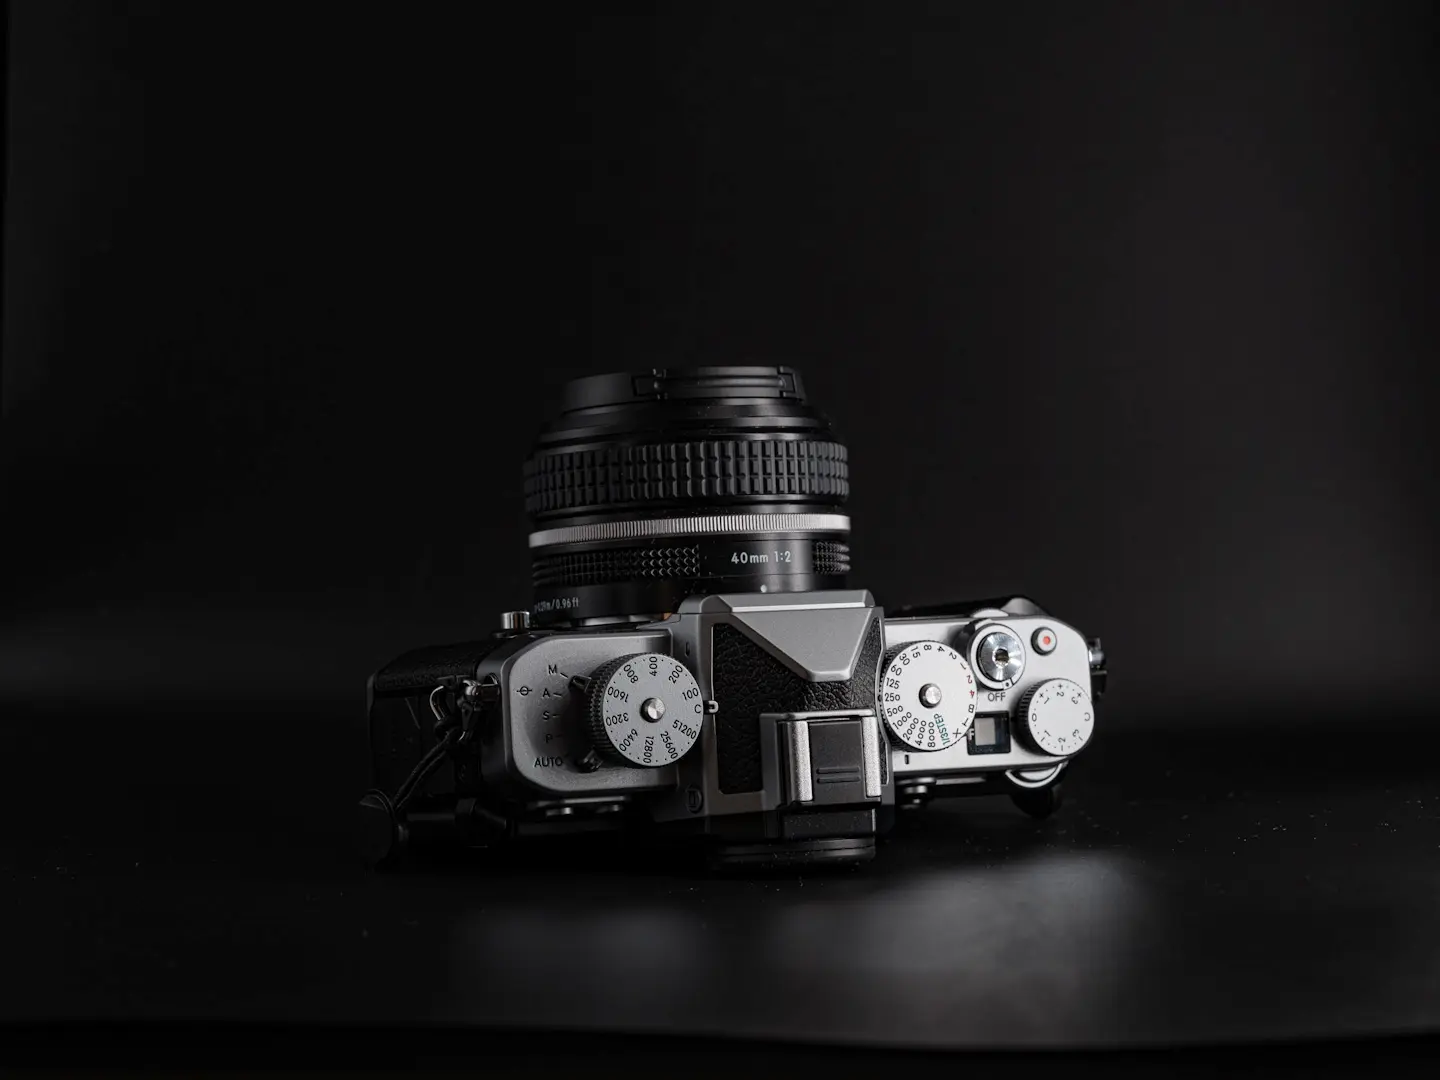
One of the things that appeals most about the Nikon ZF is that it has physical dials for shutter speed and ISO. However, for any Fujifilm shooters, they don’t always overide settings as you would expect. For instance, if you are shooting in aperture priority mode with auto ISO the shutter speed dial becomes redundant, whereas on Fuji this would change the shooting mode. On the Nikon ZF you have to choose your shooting mode using the lever at the base of the ISO dial first. Then work from there. I still usually shoot in aperture priority with auto ISO and then simply flick the shooting mode lever back to M when I want to control the shutter speed.
📘 Quick Navigation
Basic Setup (Out of the Box)

Before changing any shooting settings, it’s worth running through a few quick setup steps in the Setup Menu (spanner icon). These make the Nikon Zf behave properly from day one and avoid small issues later on.
• Time zone and date
Set your local timezone and make sure the date format is correct so your metadata stays accurate.
• Auto temperature cut-out
If you shoot video or long bursts in warm climates, set this to High.
Otherwise, leave it on Standard.
• Clean Image Sensor
Set Automatic Cleaning → Clean at Shutdown.
This keeps dust under control without you having to think about it.
• Copyright Information
Add your Artist Name and Copyright Info here.
It embeds your details into every image and is worth doing properly.
• Voice Memo (optional but useful)
If you’re shooting documentary work or want to record quick notes, set Voice Memo → Press and Hold to Record in the Image Playback menu.
It’s a simple but powerful workflow feature.
• USB Power Delivery
Turn this On if you plan to charge or power the camera over USB-C.
Useful for travel or long days out.
• Firmware Version
Check your firmware and update it if needed.
You can update via the Nikon SnapBridge app or by downloading firmware from Nikon’s website and copying it to a memory card.
Photo Shooting Menu
The Shooting Menu is where you set the core behaviour of the Nikon Zf — file formats, autofocus behaviour, ISO, and general handling. Most of these are “set once and forget,” and they form the baseline I use for almost all everyday photography.
Secondary Slot Function
Overflow
One of the weaker points of the Nikon ZF is that it uses Micro SD cards for the secondary memory card slot. I don’t even bother with one so I set my ZF’s primary slot to SD and secondary slot function to overflow but you can leave it at whatever you want as it’s irrelevant if you don’t plan to use the secondary slot either.
Image Area
FX (Full Frame)
Always keep this at full resolution unless you have a very specific reason not to.
Tone Mode
SDR
Leave this on SDR unless you specifically output to HDR displays. Most people don’t need HDR for stills.

Image Quality
- RAW – If you’re happy to process your images (my recommendation)
- JPEG – If you want usable photos straight out of camera
RAW Recording
I use High efficiency
It offers the best balance between image quality and file size, with no visible loss in real-world shooting.
Note: File sizes vary slightly between Nikon bodies, but the real-world takeaway is the same — High Efficiency gives you excellent quality without needlessly huge files.
ISO Sensitivity Settings
- ISO Sensitivity: 100
- Auto ISO Sensitivity Control: On
- Maximum Sensitivity: 12,800
- Minimum Shutter Speed: 1/200s
These values work brilliantly for everyday shooting, especially people. The Nikon Zf handles high ISO very well, so I’m happy to let the camera climb when needed.
Minimum shutter speed 1/200s freezes movement for general family, portrait, and travel photography. If you shoot sports or wildlife, increase this minimum shutter speed to suit your subject.
Zf note: the Zf’s IBIS is excellent, but IBIS doesn’t freeze subject movement — so I still prefer a sensible minimum shutter speed for people. By setting the camera up this way you can freeze movement as default in a scene but should you wish to introduce a slower shutter speed, generally you have more time to adjust to those circumstances than faster moving ones.
White Balance
Auto 1
If you’re shooting RAW, this doesn’t matter too much — it’s easily adjusted later.
Auto 1 gives a neutral result without over-correcting warm light.
Picture Control
Standard
Doesn’t affect RAW files, but it’s a good baseline for previewing how the finished image might look.
If you want to shoot black and white then the ZF has a dedicated black and white mode which you can select using the rotating dial found under the shutter speed dial. The black and white output of the Nikon ZF is one of the highlights so it’s definitely worth playing around with this.
Color Space
- Adobe RGB if you want the widest colour information for printing.
- sRGB if you mainly publish online (more compatible with screens)
I use Adobe RGB because I print frequently.
Long Exposure Noise Reduction
On
This takes a dark-frame exposure after long exposures, doubling the capture time.
Useful if you shoot night scenes or astro; irrelevant for normal shooting.

High ISO Noise Reduction
Low (JPEG only)
Keeps more detail while still reducing noise.
RAW shooters can ignore this setting.
Metering
Matrix Metering (90% of the time)
Reliable, predictable, and works for almost everything.
The Nikon ZF has an exposure compensation dial which gives you quick access to adjust exposure as you desire. This removes the need to change metering modes often. Note there is a quirk (on my ZF at least) where the exposure compensation level is shown in all modes except full manual control. In manual mode, exposure compensation still effects your image by adjusting the auto ISO number used but it does not register on the meter as negative or positive exposure compensation.
Release Mode
- Single Frame for general photography
- Continuous modes for wildlife, sports, and action
Choose based on the subject.
Focus Mode
AF-C (Continuous AF)
I rarely use AF-S on modern Nikon Z cameras — AF-C is fast, accurate, and reliable in almost every situation.
The only exception is tripod-based landscape work, where you may want AF-S or manual focus to avoid refocusing every time the shutter is pressed.
AF Area Mode
3D Tracking
Nikon’s 3D Tracking is reliable enough that I rarely switch away from it now. It gives you a precise AF box and excellent subject tracking. I simply place the box on my subject and, while holding the shutter half-pressed, recompose freely. I set up an alternative focusing method with quick access using the custom button settings (below).
Subject Detection
Auto for general use.
Switch as needed:
- People for portraits
- Animals/Birds for wildlife
- Off if shooting landscapes or products
Link VR to Focus Point
On
This stabilises the area around the chosen AF point rather than the centre — very helpful when composing off-centre subjects.
Other Computational Features
This menu also includes tools like Multiple Exposure, Time-Lapse Video, Interval Timer, Pre-Release Capture, and Focus Shift Shooting.
Use these as required — they’re not essential for initial setup.
Custom Settings Menu (Custom Controls)
The Nikon Zf allows plenty of button customisation, but it’s a different experience to cameras like the Z6III or Z8. My goal here is simple: keep the Zf fast and intuitive, with just the essentials under my fingers and everything else left alone.
Custom controls (shooting)
I set the Fn button to Metering for quick access to Highlight weighted metering.
I then replicate my Z6III and Z8 setup by setting the AE-L/AF-L button to AF-area mode + AF-ON > Single-point AF. This gives me a quick way to focus more precisely if 3D Tracking (which I use as standard) isn’t ideal for a specific subject.
Custom Settings (playback)
Everything remains at default except I set the Fn button to Voice memo.
Final Thoughts
These settings give me the most reliable, consistent results from the Nikon Zf across everyday shooting, travel, family moments, and general photography. They keep the camera simple and predictable while still taking full advantage of Nikon’s excellent autofocus and full-frame image quality. Use this setup as your baseline, then fine-tune it over time depending on what you photograph most.
📚 Read Next
Frequently Asked Questions
What are the best Nikon Zf settings for everyday photography?
For general photography, travel and family moments, I keep things simple: shoot in FX (full frame), use Auto ISO with a sensible minimum shutter speed, keep metering on Matrix, and run AF-C with 3D Tracking. The goal is consistent results without constantly changing settings.
Should I shoot RAW or JPEG on the Nikon Zf?
If you’re happy to process photos, RAW is the better option (my preference). If you want usable photos straight out of camera, JPEG is fine — and Nikon’s Picture Controls and the Zf’s dedicated black and white mode make JPEG shooting genuinely enjoyable.
What Auto ISO settings should I use on the Nikon Zf for people and travel?
As a baseline, I use ISO 100 with Auto ISO on, maximum ISO 12,800, and a minimum shutter speed of 1/200s. The Zf handles high ISO well, and 1/200s is a good default for freezing everyday movement. If you shoot sports or wildlife, increase the minimum shutter speed.
What’s the best autofocus setup on the Nikon Zf?
I shoot in AF-C almost all the time and use 3D Tracking as my default AF area mode. It’s reliable enough that I rarely switch away from it. I also set up a quick fallback option via a custom button so I can jump to single-point AF when I need more precision.
How do the Nikon Zf dials work with shooting modes and Auto ISO?
The Zf’s shutter speed and ISO dials are great, but they don’t behave like Fuji dials. For example, if you’re in aperture priority with Auto ISO, the shutter speed dial effectively becomes redundant. To switch modes, you need to use the lever at the base of the ISO dial. I usually shoot aperture priority with Auto ISO, then flick the lever back to M when I want direct shutter control.