The Olympus 75mm f/1.8 has a rather odd focal length but despite this it is regarded as one of the best lenses in the Micro 4/3 lineup.
In this Olympus 75mm f1.8 review I am going to show you how this lens performs in the real World. You wont find any charts here, just real World use and everyday photos.
Olympus 75mm 1.8 Review – Build quality
Lets not beat around the bush, the Olympus 75mm f/1.8 lens is not cheap, however it is within the price range of a lot of enthusiasts before we push into the territory of really expensive glass such as the Panasonic Nocticron 42.5mm 1.2.
The build quality of the Olympus 75mm feels excellent with its metal barrel and smooth focus ring. In matt black finish it looks beautiful attached to my black EM5II. Suffice to say you can feel where the extra money goes in comparison to lenses such as the Olympus 25mm 1.8 and 45mm 1.8. Those lenses are optically very good but they feel made to a budget whereas the 75mm 1.8 feels like no expense has been spared in crafting this lens. Easily on par with the Olympus 12-40mm f/2.8 Pro lens, in fact it feels a little nicer in the hand.
It feels well balanced on an EM5 II and even better with a grip attached. For a 150mm equivalent lens this is exceptionally small and light. But it doesn’t feel cheap. Just well built, solid and professional.
Size wise it is easier to just show you the lens compared to the 45mm 1.8 and 12-40mm f/2.8 Pro zoom to give you an idea of the size.
The 75mm compared to 45mm (left) and 12-40mm Pro (right)
I’m not going to go into detail on auto focus performance except to say that it is very quick to focus. As fast as any lens on the system. The only caveat is that in low light it can hunt a little but that is due to the contrast detect AF system on the EM5II. All lenses perform like this on the EM5 II. However I will retest it on the EM1 mk II once I have one as its phase detect focus points should help it perform better.
Olympus 75mm 1.8 Review – Image Quality
A lens like the Olympus 75mm 1.8 is a beautiful thing. I really do find satisfaction in handling and looking at a piece of glass that is this well made. There is a beautiful aesthetic to well made products and I appreciate this.
However that means very little if the performance is not up to scratch.
This is the second copy of the Olympus 75mm lens that I have owned and they both performed to a very similar level. That is they are both pin sharp. In fact this is some of the sharpest glass you will ever use should you decide that the focal length suits your style.
It is sharp from wide open with only minor improvements when stopping down to f/4 and f/5.6.
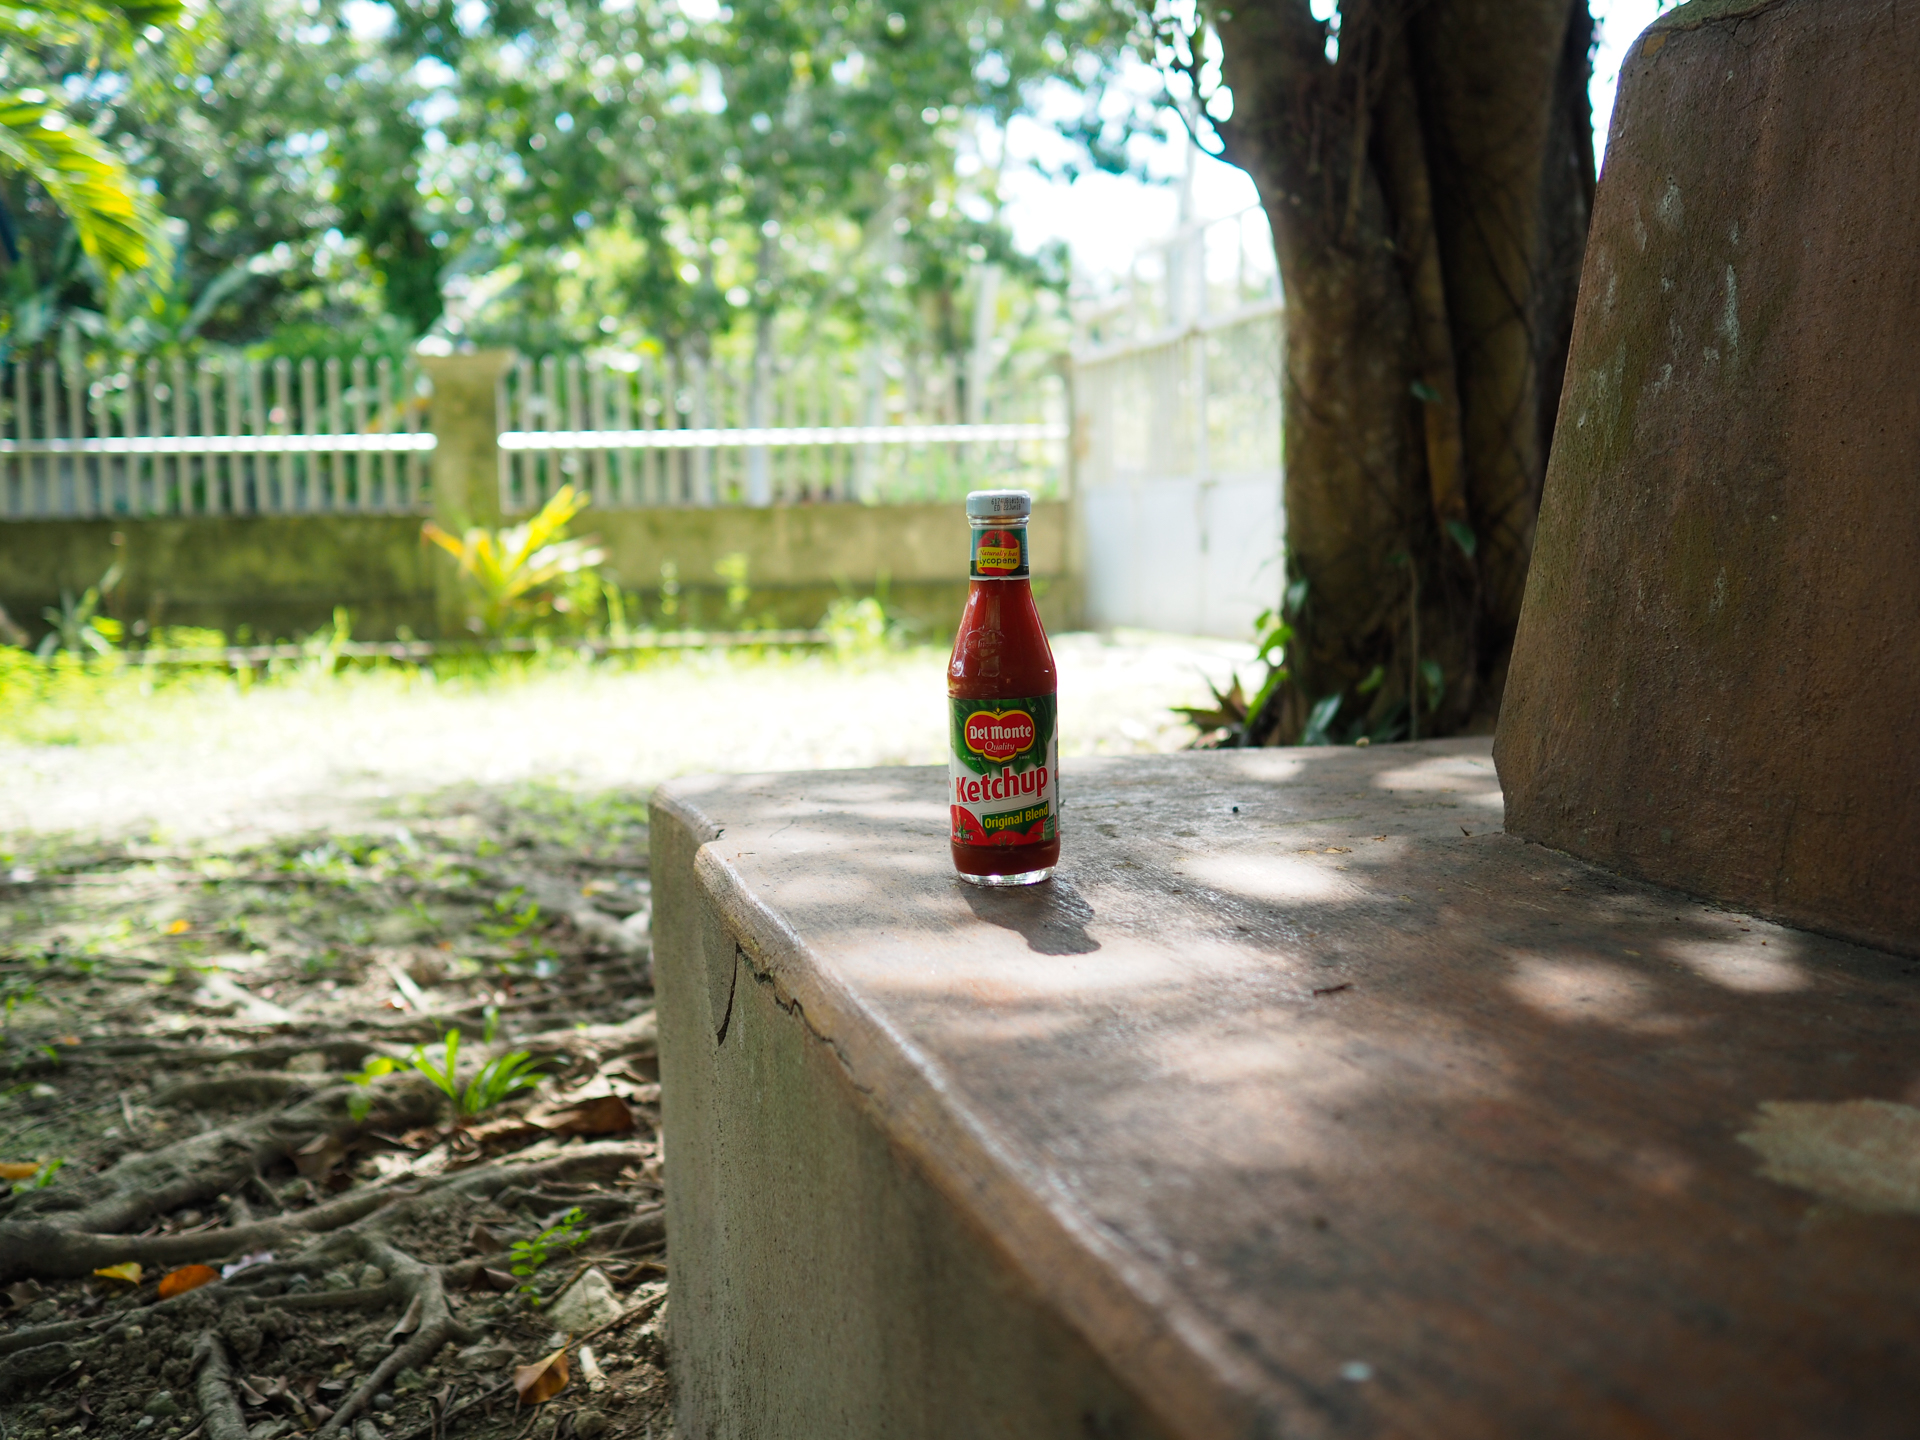
Lets take a quick look at some samples below.
Shot at f/1.8100% crop from the centre (conversion from raw with no adjustments)
100% Crop from the corner
The lens is sharp and gives plenty of detail even wide open at f/1.8
Stopping down to f/4 increases IQ slightly
All the above images were shot in raw and then exported as jpegs for the website without any adjustments in lightroom.
The Olympus 75mm 1.8 is pin sharp in the centre at 1.8 with some slight loss of quality as we get out to the edges. One thing you can pick up on here is a little bit of purple fringing in the corners in the first image. I’ll go in to that in more detail later.
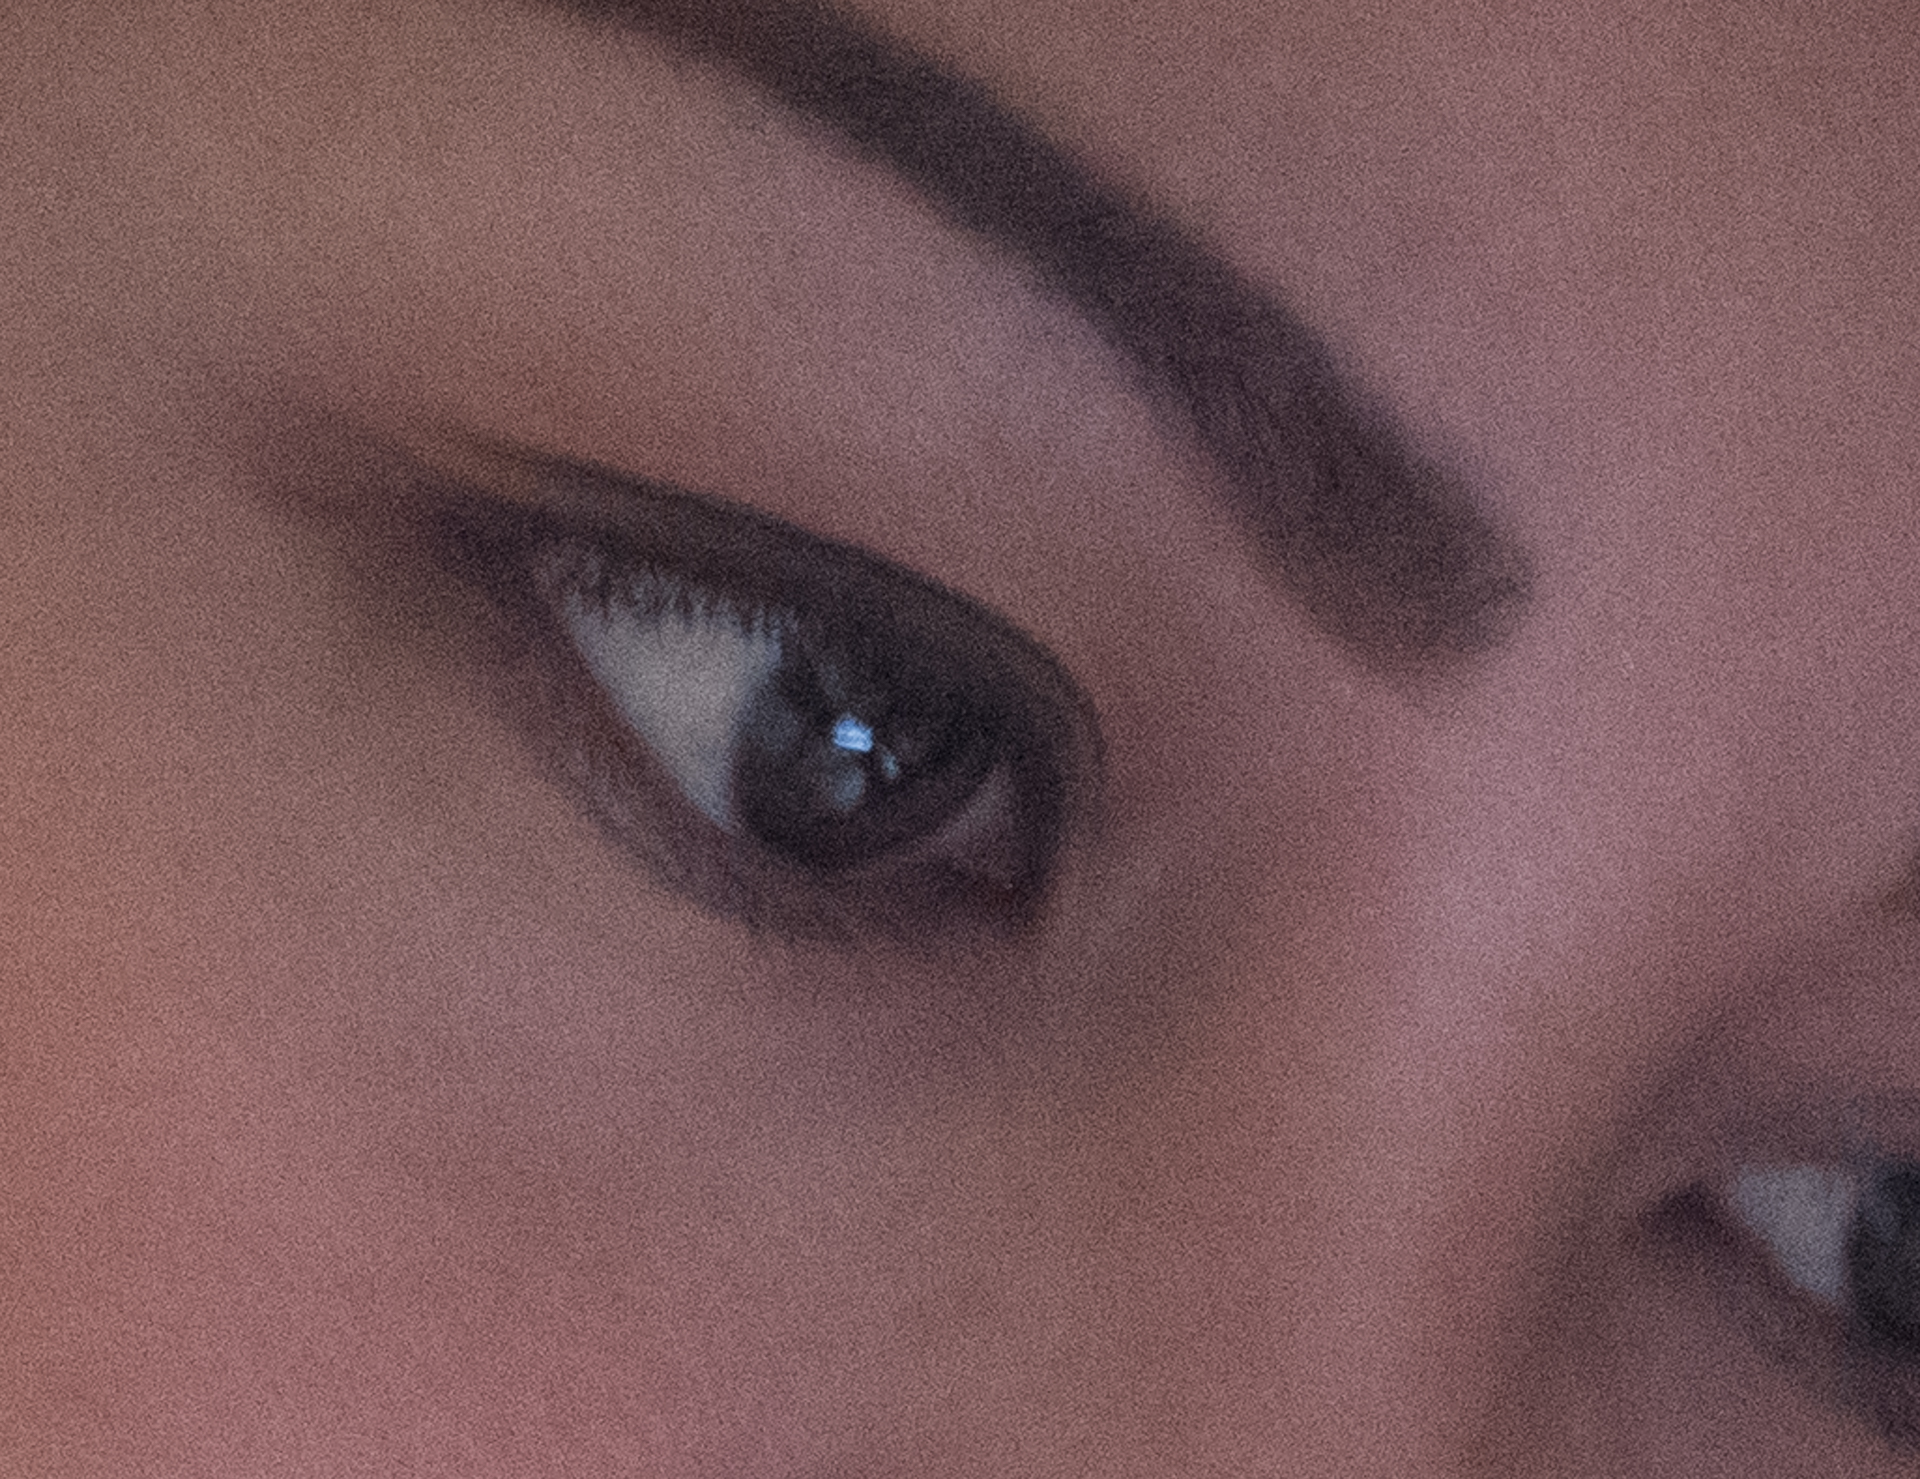
Here’s a shot of my wife that I took which shows how sharp details such as eyelashes look when shooting portraits. I didn’t make any extra effort to get a really sharp shot here. This was how it came out when we were playing about taking pictures.
Shot at F/8 using off camera flash but sharpness is nearly as good even wide open.
Bokeh
It’s pretty obvious that a lot of us buy fast glass for the ability to throw the background out of focus. Some lenses exhibit nervous bokeh (out of focus areas) and others render the scene in to a dreamy hazy creaminess. It is somewhat subjective to analyse bokeh with many factors playing a role. However I can say that the Olympus 75mm 1.8 offers creamy smooth bokeh with a gentle fall off. It doesn’t suffer with nervousness which can cause the out of focus areas to become distracting to the viewers eye. But hey, why read about bokeh when it is easier for me to show you a few examples below.
Shot at f/1.8Look at the difference in subject isolation between the previous shot and this one shot at f/4.
Is the Olympus 75mm f/1.8 a perfect lens?
It’s pretty close to perfect if the focal length suits you. However there are two points that I would note.
It is not weather sealed but I don’t mind as this is a specialist lens for particular situations. It is not intended to be a do everything lens like the 12-40mm Pro. Therefore weather sealing while nice is not essential.
It suffers with some Purple fringing in very high contrast scenes.
Lets talk more about the purple fringing
This is quite a common flaw in many of todays lenses and I am not usually put off by it as long as a lens doesn’t suffer too badly.
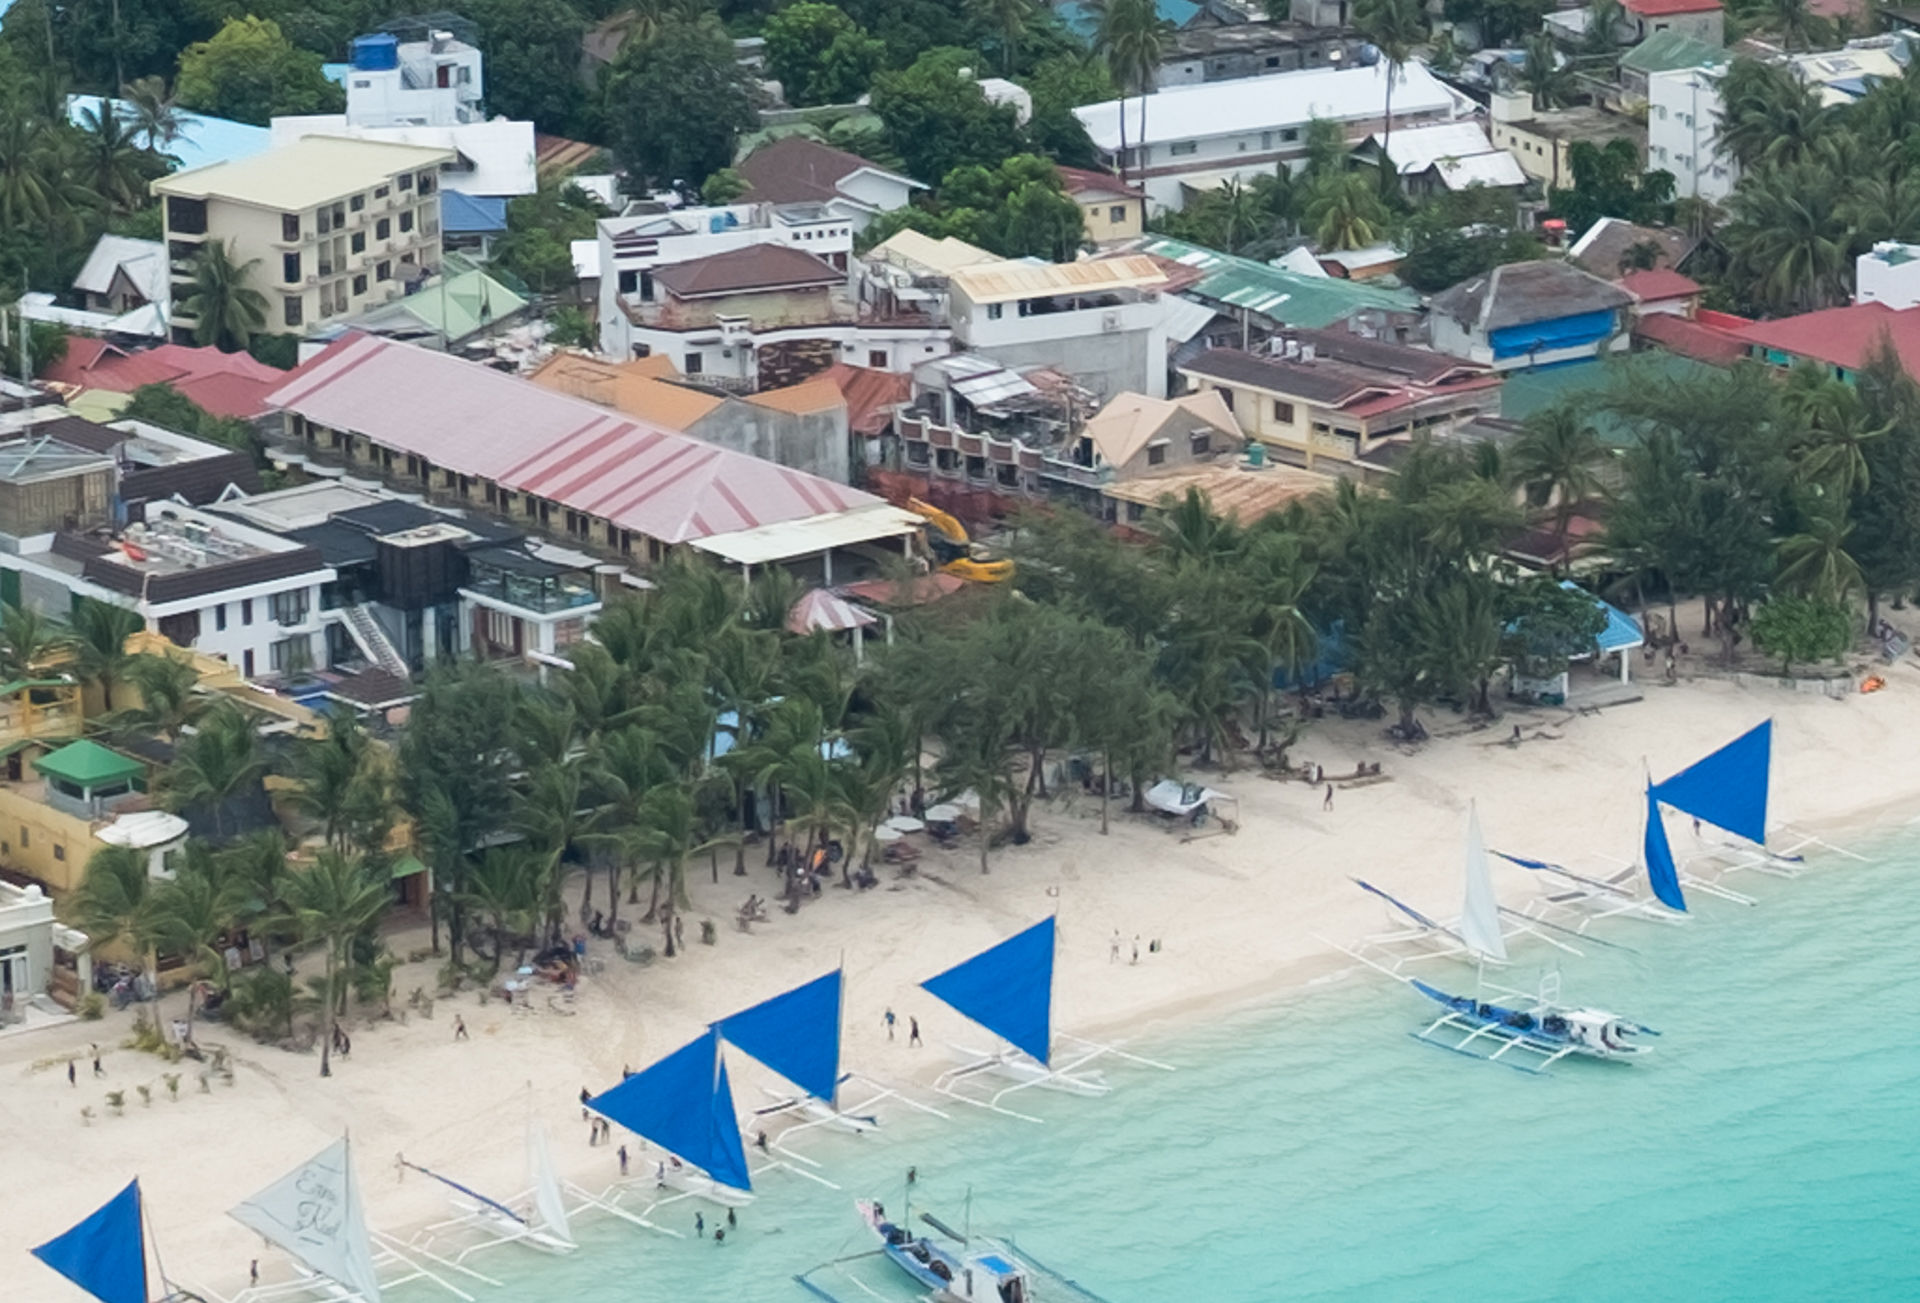
The Olympus 75mm f/1.8 lens does suffer some purple fringing when shooting very high contrast scenes. The real acid test for this kind of fringing is always backlit leaves on trees so I shot a few example to see how it performed.
Notice the purple fringing due to the very high contrast scene. This is 100% crop of the worst affected area of the image
Just bare this in mind if you are going to shoot in very high contrast conditions but I would not let it put you off what is otherwise a superb performing lens.
Olympus cameras generally do a good job of removing Chromatic abberations in camera using profiles for each lens so it is not always a problem. I have also intentionally shot the lens in what is the most difficult situation so that I can highlight any flaws.
The Olympus 75mm 1.8 doesn’t exhibit any issues with lens flare. In fact I shot it straight into the sun through some leaves and it coped remarkably well. It retained plenty of contrast in the image. Move the sun just out of frame and you have no problems with flare at all.
The lens does not suffer any noticeable levels of distortion.
Olympus 75mm 1.8 review – Verdict
Overall the Olympus 75mm is a great performing lens. Optically it is one of the sharpest lenses I have used for any system. If you are using micro 4/3 and you want to define every eyelash in your vicitms (ahem sorry I mean subjects) then this lens can easily do that. The creamy bokeh and sharp glass from wide open mean that you can use this lens exactly how it is intended to be used.
The fact that Olympus do not provide a lens hood with a more premium lens like this still grates a little but in the end the results that this lens can produce makes it worth the added cost over something like the 45mm 1.8.
However if you are just looking for your first portrait lens to add to say, a standard zoom, then I would advise you to look more closely at the incredible value of the Olympus 45mm f/1.8. It is sharp, light and a lot cheaper than the 75mm. Plus I find the focal length much more useful in a wider range of situations.
If you found this review helpful then all I ask is that if you buy anything from Amazon that you click on my links below first so that I can earn a small (and I mean tiny) commission. It wont cost you a penny (cent, pesos) more.
I have access to and use a lot of cameras yet I choose to travel with an Olympus OM-D E-M5II. Here are just 7 reasons why Micro 4/3 offers the best cameras for travel photography.
1. Size and weight
Cameras like the Olympus OM-D E-M5 II, Pen F and Panasonic GX-8 are small, light and well-built cameras. When you are looking for a camera for travel photography you have to consider just how much you want to carry with you. Yes the Sony A series are in some cases equally as small but then add in a decent zoom lens and a couple of primes and the difference in weight grows substantially. I carry with me an Olympus EM5II, Olympus HLD 8 battery grip, Olympus 12-40mm f/2.8 Pro, Olympus 25mm f/1.8, 45mm f/1.8 and 75mm f/1.8. My Olympus system feels modular in nature. I can choose to go from really small and light using just the EM5II and the 25mm 1.8 or I can add the grip and use the 12-40mm Pro lens on the fully gripped body for extra battery life when I am on extended shoots.
2. Image Quality
Cameras from Olympus and Panasonic offer me a lightweight system without compromising on image quality. Some people will say you need a full frame camera and you may, if you specifically want the most shallow depth of field possible and the best high ISO noise performance. However if most of your photography is not shot in pitch black conditions at night and you don’t just want one eye in focus for portraits then Micro 4/3 is more than capable.
The differences between Micro 4/3 and APS-C in anything below 3200 ISO are negligible. In fact in a blind test I would be willing to bet 95% of people could not tell what sized sensor was used between the two. It more than meets the standards needed to submit your photos to stock photography sites and earn some cash to pay for all those trips. Add in the incredible in-body image stabilisation and you can shoot at much lower ISO’s than using other cameras without IS. So not only can you shoot at lower ISO’s to give the best possible image quality but you may not need to drag your tripod with you everywhere. The OM-D E-M1 Mark II allows you to get sharp hand-held shots at shutter speeds of 1 second and longer. I have printed 30×20″ prints from Micro 4/3 and hung them and most importantly sold them in galleries. They stand up well when proper technique is used.
Image quality is great on Micro 4/3. Prints up to 30×20″ at gallery quality, more than good enough to sell for stock. What more do you need?
3. Lens Choice
Micro 4/3 offers a huge range of lenses so that whatever your shooting style there is bound to be a lens that fits. The system has lenses from the tiny Panasonic 14mm f/2.5 up to Pro grade zooms like the Olympus 300mm f/4. In general the lenses are very sharp. I love the results from my Olympus 12-40mm f/2.8 Pro. I’d go as far as to say it is my favourite zoom lens of any system (and I have used a lot of Canon L glass and the Nikon 2.8 zooms). Want the best value portrait lens in the World? Pick up the Olympus 45mm f/1.8 for around £200 and you got it. That little lens is sharp and incredible value. It also takes up virtually no weight in your bag.
My Olympus prime lenses. From left to right the 25mm 1.8, 45mm 1.8 and 75mm 1.8.
I find that these complement my 12-40mm f/2.8 Pro lens perfectly.
Take a look at the huge range of Micro 4/3 lenses available here
4.Electronic Viewfinder.
When you are considering which camera is best for travel photography you have to remember that often you don’t have a lot of time to get the shot. You may be working on a deadline or maybe your family are waiting for you and asking you to hurry up because they want dinner. If you are using a standard DSLR with an optical viewfinder it is quite likely that you will take the shot and then have to check it on your rear LCD screen to see if the exposure is correct, is it in focus, how are the colours etc. I remember shooting with a Canon 5D MK II for years and as good as that camera was, there was a process required to get the shot that I wanted. It involved checking my image on the rear LCD screen, then correcting the exposure, re-shooting and so on. It might often take 5 shots to get everything perfect. All the time your family are giving you that look that says, we are bored now, hurry up. With an electronic viewfinder what you see in the viewfinder is what you get in your final image. No more chimping on the rear screen afterwards. Select your settings and take the picture. You already know that you got the shot. Now it’s time to go and enjoy dinner with a happy family.
5. Image Stabilisation
I cannot overstate how useful it is to have image stabilisation built-in to the camera body. There are so many benefits. It increases your keeper rate. No more blurry photos because you had too much coffee that morning and your hands were shaking. No more worrying about getting sharp food shots when you are in poor light in that restaurant. Simply select the ISO, aperture and shutter speed you want and the IS system will do the rest. Tack sharp food shots and great IQ because you could use a lower ISO setting. Don’t want to lug a tripod around with you. No problem as the latest in body IS has you covered for shutter speeds as low as a few seconds. Not only does this allow you to keep your ISO low but it gives you creative flexibility to use slower shutter speeds in order to blur water or show movement without having to carry tripods. Your travel photography will become more creative and your back will thank you later.
In-body IS means that you can leave your tripod at home more often.
6. Discretion
I have traveled to every continent except the Antarctic. I have lived in many countries and one thing that I have always found is that with a smaller camera you can take photos without gaining too much attention. If you are carrying around a hulking great DSLR with Pro f/2.8 lens attached then you stand out like a sore thumb in many countries. It also feels a little awkward when you are carrying around gear that costs more than the average annual salary of a worker in some countries. Being discreet allows you to blend in (or at least not stand out as much) and get photos that just wouldn’t be possible with a DSLR and huge white lens attached. When people see DSLR’s they get a little camera shy, their expressions often change and they may even wish to avoid being photographed altogether. Pull out your cute looking Olympus Pen F and it is a totally different story. You will look like a tourist, an amatuer but that’s great, Just what you want because you know that inside your ‘cute’ ‘inexpensive’ looking camera the image that you just captured is just as good as your DSLR could have done.
7.Video.
If you’re a striving creative who wants to add to their skill set and portfolio then you will probably want to get in to video. It is a great way to bring your audience with you and show them the beauty of the places that you visit. Micro 4/3 offers all of the above benefits while giving impressive video quality. My OM-D E-M5II offers full HD video at up to 60 frames per second. That allows for some slow motion capture . It even has the ability to create slow motion in camera. Combine the decent video quality with in built image stabilisation and it is no longer a chore to set up and create travel videos to go along side your photos. The Olympus OM-D Em1 II offers 4k video with excellent quality. If you are really serious about video then Micro 4/3 offers the best video camera below a full blown pro rig in the form of the Panasonic GH5. It gives you Internal 4K/30p 10-bit 4:2:2, 4K/59.94p and 50p shooting with 10-bit 4:2:2 external output or 8-bit, 4:2:0 internal at 150Mbps IPB, 1080 video at up to 180p, Pre-config rack focus mode, Waveform and vectorscope monitors, Paid upgrade for V-Log video capture with preview display using luts. This will be my next investment as I get more and more in to video work.
So there you have 7 reasons why Micro 4/3 make the best cameras for travel photography. I didn’t even mention that they offer some of the best built and most weather sealed cameras, the benefits of the 2x crop factor for wildlife shots or that manufacturers such as Olympus often upgrade the cameras throughout their life cycle to add improvements and new features. That is the sort of customer service and product support that gives me confidence to buy their cameras.
If you want to look in more detail at how Micro 4/3 compares against APS-C sensors then I did a comparison here
Want to make sure you get the sharpest photos possible then check out my article here
If you want to buy any of the cameras mentioned in this article then you can do so at no extra cost by purchasing through my Amazon links. Thank you if you make any purchases as it really does help me to keep this site going.
What camera do you use for your travel photography? I’d love to hear your thoughts below.
I just took delivery of the Fuji X-T2 and I already have the Olympus Pen F. Seeing as though these two cameras are well known for their black and white output I thought it would be fun to add some comparison shots each day as I test them more and more. So make sure you check back as this page will be added to regularly whenever I shoot black and white images with both cameras.
If you have black and white images from one of these two cameras (or the X-Pro 2) that you would like to share then email me or leave a comment and we can build up a great library of shots to give everyone chance to see which black and white mode produces more pleasing photos.
Here’s the first couple of shots.
Pen F + 17mm f/1.8 , @1.8, 1/320, ISO 200. Black and white mode 2, no filters.Fuji XT2 + 23mm f/1.4 @ 1.4, 1/350, ISO 200. Fujifilm Acros, green filter.Fuji XT2 + 23mm f/1.4 @ 2.8, 1./550, ISO 200. Acros, green filterPen F + 17mm f/1.8 @ 1.8, 1/1250, ISO 200. Profile 2 no filtersPen F + 17mm f/1.8 @ 1.8, 1/160, ISO 1600. B&W Mode 2 , no filtersFuji XT2 + 23mm f/1.4 @ 1.4, 1/124, ISO 640. Acros, no filters
A couple of quick portraits
Fuji XT2 + 90mm f/2 @ f/2, 1/125, ISO 2500. Across no filtersOlympu Pen F + 45mm f/1.8 @ 1.8, 1/160, ISO 800. Black and white profile 2 no filters.
And a couple more from today
Olympus Pen F + 45mm 1.8 @1.8, 1/1250, ISO 200. Profile 2 no filtersFuji XT2 + 90mm f/2 @f/2, 1/1000, ISO 200. Acros no filtersPen F + 17mm f/1.8 @ 1.8, 1/125, ISO 640 Profile 2 no filtersPen F + 17mm f/1.8 @ 1.8, 1/200, ISO 200 Profile 2 no filtersFuji XT2 + 23mm f/1.4 @1.4 , 1/250, ISO 250 Acros + yellow filter
In this latest showdown between the Olympus Pen F vs OMD EM5 II I’ll take a look at these two popular Micro 4/3 cameras and compare features, handling and image quality to see which one you should buy.
I have had both these cameras for a couple of months now so I have been able to really get to know them. As always with my reviews I bought both cameras myself and have no bias either way. I simply test them, shoot them and tell you how it is. You can also see how the Pen F fares in my Olympus Pen F vs Fuji X100T showdown Or if you simply want to see more about the those two cameras then see my Olympus Pen F Review or Fuji X100T Review . You can see my full Olympus OMD EM5 II review here
Olympus Pen F vs OMD EM5 II – Features
So let’s take a quick look at the features of each camera before we delve a little deeper to put them up against each other in real World use.
Olympus Pen F features
New 20mp sensor The new sensor gives an image size of 5184 x 3888 pixels
5 Axis Image Stabilisation built in to the body.
2.36 million dot OLED Viewfinder. The viewfinder on the Pen F is the same as that found in the Olympus OM-D E-M10 II offering 1.23x magnification.
10 FPS mechanical shutter and up to 20FPS with the electronic shutter.
Fully articulating 1.04 million dot 3″ touch screen LCD screen.
50mp High res shot mode.
1/8000 mechanical shutter speed , 1/16000 with the electronic shutter.
1080/60p video.
Colour Wheel control dial giving access to fine tuning of black and white, colour and ART profiles.
Olympus OMD EM5 II Features
16mp sensor The OMD EM5 II sensor gives an image size of 4608 x 3456
5 Axis IS built in to the body
2.36 million dot OLED Viewfinder Offering 1.48x magnification
10 FPS mechanical shutter
Fully articulating 1.04 million dot 3″ touch screen LCD
40mp High res shot mode
1/8000 mechanical shutter speed, 1/16000 with electronic shutter.
1080/60p video
Fully weather sealed body
As you can see when comparing the Olympus Pen F vs OMD EM5 II these two cameras are more similar than their looks may suggest. The major differences are the new 20mp sensor found in the Pen F, the range finder style of the Pen F placing the viewfinder on the left of the camera rather than having the centrally located viewfinder hump of the OMD EM5 II and the weather sealing offered with the EM5 II which is lacking on the Pen F.
Both cameras feature a 2.36 million dot OLED viewfinder but the OMD EM5 II offers more magnification which results in a larger and more detailed image. In practical use the differences are not huge and are only really noticeable when switching straight from one camera to the next. Both offer a clear and crisp view of your subject and both work well in low light. Manually focusing is slightly easier on the EM5 II thanks to the larger view offered.
The Pen F does not feature weather sealing unlike the OMD EM5 II. If you plan to use your camera in adverse weather conditions such as rain, snow or in dusty environments then the weather sealing of the OMD EM5 II is a real advantage. Assuming of course that you have matching weather sealed lenses such as the Olympus 12-40mm f/2.8 Pro.
The Pen F is more suited to use with small and light primes which themselves are not weather sealed so it makes sense for the Pen F to also lack weather sealing. Still a big plus for the EM5 II here.
Olympus Pen F vs Olympus OMD EM 5 II – Handling
Handling of the two cameras is a very important factor when trying to decide between them.
Size wise they feel very similar at 125 x 72 x 37 mm (Pen F) and 124 x 85 x 45 mm (EM5 II) although the Pen F comes in a little lighter at 427 grams compared to the EM5 II’s 469 grams. In reality the differences are marginal
The EM5 II offers a more standard mini DSLR feel with a viewfinder hump in the middle and a small hand grip on the front. It feels well-balanced with even the larger pro zoom lenses in the Olympus range.
On the other hand the Pen F is a range finder styled camera with its viewfinder placed on the left hand side. This will suit right eye dominant shooters. There is no grip on the front of the camera but the thumb rest on the rear does give enough purchase to comfortably hand hold the camera with one hand when using primes. The Pen F features a more simple external layout with less function buttons on the top plate. This makes the Pen F feel less cramped in use. It also features a physical exposure compensation dial which is well damped. In reality I’m not sure how much a physical exposure compensation dial really adds to a camera where you are still changing shutter speed and aperture in the standard way with the front and rear control dials.
The uncluttered layout on the Pen F is very user-friendly.
The finish on both cameras is excellent with them both sporting good build quality, well damped dials and magnesium alloy bodies. Both have a high quality leatherette wrap which adds to grip. The buttons on the OMD EM5 II feel slightly more rubberised when pressing them due to the weather sealing but both give good feedback in use.
Both cameras feature 1.04 million dot 3″ touch screen LCD’s but the Pen F’s is easier to use as I sometimes found that when opening the EM5 II’s screen it would pop the electronic viewfinder eyepiece off. This was a rather common and irritating occurrence leading me to spend 20 minutes trying to find where the eyepiece was on one occasion.
Here is the offending viewfinder eyepiece which came off accidentally when I was moving the EM5 II to take some photos. So I thought I’d take a picture of it.
The Pen F’s LCD screen is also easier to open as the back is less cluttered and easier to position your fingers to get decent grip. I can open the Pen F LCD quickly using my thumb at the bottom to flick it out. If I use the same technique on the EM5 II it causes the LCD to push up slightly which then pops the viewfinder eyepiece off.
The LCD on the Pen F is easier to flip out quickly.
One feature of the Olympus Pen F is the ability to use the LCD screen as an auto focus track pad when shooting through the viewfinder. Simply slide your thumb around the screen to change the position of the auto focus point. In practise it works well and is a very quick way to change your AF point.
You can see this in action in my video below. It is important to ote that when actually doing this in practise the viewfinder shows the auto focus points spread too.
I also noticed that there was less lag when switching between the LCD and electronic viewfinder with the Pen F. On occasion the OMD EM5 II would fail to pick up that I had switched resulting in staring at a black viewfinder.
With the addition of the new colour wheel the Pen F allows you direct access to the new black and white mode as well as a new colour mode alongside the Art modes.
The new Colour wheel on the Olympus Pen F is great for Jpeg shooters
If you shoot Jpeg and like black and white then having direct access to these as well as a dedicated switch on the rear of the camera to cycle through the options not only saves time but involves less diving in to menus. I’ll talk more on the actual black and white output in the image quality comparison below.
Both cameras feature Olympus’ excellent 5 axis IS but I found it to be slightly more effective on the EM5 II probably due to the lower resolution sensor. I could handhold the Pen F down to 1/2 second but could stretch that to 1 second with the EM5 II.
The EM5 II also features a separate memory card slot whereas the Pen F memory card fits in to the battery compartment and removing the memory card can sometimes be a bit fiddly as there is not much room to grip the memory card when extracting it.
Olympus Pen F vs OMD EM5 II – Image quality
So here the Pen F’s new 20mp sensor goes up against the 16mp sensor of the OMD EM5 II.
I have shot both of these cameras in loads of different situations from brightly lit portraits to landscapes and night shots to get a real feel for how they both perform.
Resolution
The Pen F offers an image size of 5184 x 3888 compared with the EM5 II’s 4608 x 3456 pixels. If you pixel peep you can see a very small increase in the resolution and detail of the Pen F images when compared to the EM5 II. The differences are small though and you wont even notice them in every shot you take. For me this difference was most noticeable in portrait shots when looking at eyelashes and eyebrows with the Pen F image just giving a little more detail.
The Pen F image also shows slightly improved dynamic range with the EM5 II blowing out highlights more than the Pen F and showing less detail in shadows. The differences are not huge but they are there. The two images below were shot at exactly the same settings on both cameras.
OMD EM5 II image shot at ISO 200.Pen F shot at ISO 200Here you can see the slight difference in resolution between the Pen F (left) and the EM5 II. Notice the Pen F is retaining more detail in the shadow areasNotice the Moire on the OMD EM5 II image (right).
Although the image quality improvements of the Pen F are not huge the slight improvements in almost every area are welcome.
Noise performance between the two sensors is very close with again just a slight advantage going to the Pen F.
At base ISO I found that often the EM5 II image had some noise whereas I never saw this with the Pen F. I remember the base noise found on my original OMD EM5 put me off using it for professional landscape work. I’m glad to see the Pen F seems to have resolved this issue. Once the ISO is pushed to 3200 and above the noise performance of both cameras was very similar with the Pen F just retaining a little more detail in the raw files thanks to it’s higher resolution. It looks like Olympus kept the same noise performance while increasing resolution so while this is not mind-blowing it is a decent enough upgrade.
ISO 3200 comparison between Olympus OM-D E-M5 II (left) and the Pen F
More detail is retained in the Pen F image (right) than on the 16mp sensor of the OM-D E-M5II
The OMD EM5 II image (left) shows more noise in the reds at the top right of the image
Olympus Pen F vs OMD EM5 II – Black and white
One of the main new features of the Pen F is the colour wheel found on the front of the camera. As mentioned before it allows you direct access to among other options the black and white modes.
The Pen F has 3 black and white profiles compared with the EM5 II’s 1. Profile 1 is a flat monochrome, 2 is the Tri X high contrast look and 3 is an infra-red esque mode.
Profile 2 is by far and away the nicest to use.
When selecting black and white on the colour wheel you then choose your preferred profile in the Olympus Super Control Panel and whether to add grain or not (available in 3 strengths). You then access the colour wheel controls via a dial on the back. This then gives access to colour filters which unlike the OMD EM5 II are available in 3 varying strengths. Next up you can add a vignette to brighten or darken the corners and finally you have access to the images tone curve. You can also access the tone curve on the EM5 II but with the Pen F you can adjust the mid-tones too.
In terms of in camera customisation the Pen F wins here with more options and quicker access. Monochrome profile 2 can produce really pleasing black and white images and no matter what I did with the EM5 II I could not replicate the results of the Pen F’ built in profile.
Pen F black and white mode 2
Pen F black and white mode 2Pen F black and white mode 2
B&W Mode on the OM-D E-M5 IIOMD EM5 II standard black and white mode
OMD EM5 II with contrast increased to try and replicate black and white mode 2 on the Pen F
Adding grain On the Pen F
Adding grain is really simple and adjustable in 3 stages, low, medium and high. Below are examples of the grain produced by the Olympus Pen F.
Pen F black and white mode 2 no grain.
Pen F black and white mode 2 low grain
Pen F black and white mode 2 medium grain
Pen F black and white mode 2 High grain
If you want the best image quality between these two cameras then the Pen F wins but in my opinion the differences in image quality are not enough to be the decisive factor when deciding between these two cameras.
Olympus Pen F vs OMD EM5 II – Conclusion
So which camera is the best?
In its favour the OMD EM5 II is weather sealed, has a bigger viewfinder, separate memory card slot, front hand grip and a 3.5mm external mic jack and it feels better when combined with larger lenses. It is also cheaper than the Pen F by a couple of hundred Pounds.
In favour of the Pen F are 20mp sensor, improved image quality, faster performance, additional Jpeg customisation, LCD track pad functionality.
There is no doubt that the OMD EM5 II is the better value camera, offering almost everything that the Pen F does in terms of features and image quality while being weather sealed, offering a better viewfinder and at a cheaper price. If you plan to use your camera in wet, cold, dusty conditions and team it up with a weather sealed lens then the choice is clear. Get the EM5 II. If you manually focus then you may also appreciate the larger viewfinder.
However the Pen F is the more fun camera to shoot with. The camera feels and looks great with small prime lenses, making a great fun and discreet street photography tool. The image quality is slightly improved over the EM5 II so if you want the best image quality that Olympus currently offers then the Pen F is the winner.
The new black and white modes and colour wheel are very intuitive to use and they offer great control over Jpeg output. Even as someone who used to shoot raw I found this mode highly addictive and the results are very pleasing. If you like the rangefinder style and are right eye dominant then the track pad auto focus selection is excellent.
Shoot zooms in bad weather and want the best value camera then buy the OMD EM5 II
Shoot primes, don’t need weather sealing and want the best IQ of the two then buy the Pen F.
Both are great cameras and fun to use but the Pen F is a camera that feels like it has a soul and I really enjoy using it. The EM5 II feels like a tool and a very good one but it feels much more clinical than the Pen F. If I am taking just one camera out with me then the Pen F comes along and the EM5 II stays in my bag. That sums it up really. The Pen F inspires me to shoot when the EM5 II doesn’t.
You can see more image examples and information in my Olympus Pen F Review or maybe you are considering the Pen F vs Fuji X100T if so check out that comparison.
Make sure to comment below and let me know which camera you prefer and why. Which one did you end up buying and did you make the right choice?
The Pen F and OM-D E-M5 II are both available from my Amazon links below. If you appreciate the time that I have put in (and it has been a lot of time today. Uploading the video alone took 7 hours thanks to a slow internet connection) to creating this article and video for you then please shop using my links. You can buy through them at absolutely no additional cost to you and no matter what you purchase I receive a small commission from the retailer. That commission helps me to keep this site going and to keep bringing you real world reviews and comparisons. It is the only way I make any money for all the time and effort that I put in to this website so thank you to each and every one of you who shops through the links below.
These two cameras are among the most popular retro styled cameras currently available. So I decided to put the Olympus Pen F vs Fuji X100T to see which camera is better built, has better handling and most importantly which produces better images.
I also shot a video if you don’t want to read all of this although I add a few more details here
So before we dive right in lets take a look at the features of each camera to see what you get before we put them up against each other in real World use.
Olympus Pen F features
New 20mp sensor The new sensor gives an image size of 5184 x 3888 pixels
5 Axis Image Stabilisation built in to the body.
2.36 million dot OLED Viewfinder. The viewfinder on the Pen F is the same as that found in the Olympus OM-D E-M10 II offering 1.23x magnification.
10 FPS mechanical shutter and up to 20FPS with the electronic shutter.
Fully articulating 1.04 million dot 3″ touch screen LCD screen.
50mp High res shot mode.
1/8000 mechanical shutter speed , 1/16000 with the electronic shutter.
1080/60p video.
Colour Wheel control dial giving access to fine tuning of black and white, colour and ART profiles.
Fuji X100T Features
16mp APS-C X-Trans II Sensor . Sensor size is 23.6mm x 15.8mm giving an image size of 4896 x 3264 pixels.
Hybrid viewfinder with 2.36 million dot LCD. This is both an optical and electronic viewfinder
Fixed 23mm f/2 Lens with leaf shutter, in built flash and ND filter
Mechanical 6FPS shooting speed.
1.04 million dot 3″ Fixed LCD
1/4000 mechanical shutter speed, 1/32000 with electronic shutter
1080/60p video
Fuji Film Profiles
Now before I start, both the Olympus Pen F and the Fuji X100T are great cameras. Both have a large following and the X100 series from Fuji has almost legendary status.
However a lot of people say that at the price you would be crazy to choose a micro 4/3 sensor over an aps-c or full frame camera. If you think that’s the case then you might want to see my Micro 4/3 vs APS-C article
Sensor size is not the only factor to consider here though. You need to look at the camera as a whole when deciding between the Olympus Pen F vs Fuji X100T and in the Pen F’s case that includes all the light and superb lenses available from Olympus and Panasonic.
Handling
Before writing up this Olympus Pen F vs Fuji X100T article I have had the chance to use both these cameras for an extended period. The Fuji for nearly two years and the Pen F for nearly two months now. I bought these camera with my own money (as I do with all my gear). I have no bias to any manufacturer or system although I have to admit that both Fuji and Olympus are among my favourite brands for cameras.
This is because they both continue to innovate and bring us great new cameras, lenses and features. Both Fuji and Olympus cameras are feature rich, more so Olympus as they give us incredible tools like 5 axis IS, live bulb, live time and the new high resolution mode. Fuji keeps it a bit more simple but that’s fine with me also as they give us great film simulations and beautifully handling cameras with real external dials for shutter speed, exposure compensation and aperture rings on most of their lenses which are a joy to use.
The Olympus Pen F and Fuji X100T feel similar when holding them. The Fuji X100T is a little larger at 127 x 74 x 52 mm compared to the Pen F’s 125 x 72 x 37 mm and slightly heavier at 440 g while the Pen F is 427 grams. However don’t forget that the Fuji includes a lens at this weight. Once you add a lens like the Olympus 17mm f/1.8 to the Pen F it actually feels a little heavier than the X100T.
The Olympus Pen F feels a little more solid. Both are well made but when holding them next to each other the Pen F feels better made. The Fuji has a small grip on the front whereas the Pen F does away with any front grip. The thumb rest on the Pen F gives decent purchase which makes the camera comfortable to hold.
I have the silver versions of both and they look very stylish although I actually wanted the black Pen F but it was out of stock and I couldn’t wait to get my hands on this stylish camera.
The design of both cameras is nice but the Pen F wins in the style stakes with its beautiful shape, luxurious metal finish and a higher quality faux leatherette grip.
The dials feel better built on the Olympus, giving better feedback and feeling more solid in use. For example both cameras have exposure compensation dials but the Fuji’s is a little easy to accidentally knock while the one on the Pen F is stiffer and requires intentional movement to change.
Both cameras have plenty of external dials but they go about implementing them in different ways.
The Fuji X100T goes for an old school aperture ring on the lens as well as shutter speed dial on the top. There is no ISO dial like you find on the Fuji XT1 but I don’t miss it that much.
Shooting with the X100T is very intuitive and it’s nice to be able to see your settings without having to look at an LCD screen or viewfinder.
The Olympus Pen F uses a more standard PASM dial and control dials in front and behind it to control your settings. I actually find this to be slightly quicker to use in practise but there is not much in it so choose what you prefer. It is nice to see Olympus putting a push to lock button on the PASM dial. You simply press it to lock and press again to unlock.
The Pen F also has a physical exposure compensation dial with +-3 ev available. The on/off switch is also nice to use. I actually prefer it to the on off switch on the Fuji which can be a little hard to use sometimes as it is just a bit too small.
As you can see in my video the Fuji features a small hand grip on the front whereas the Pen F doesn’t. However the thumb grip on the Pen F is larger and makes up for this. I actually feel that I have a better grip on the Pen F but again with both cameras the differences are quite small.
The Pen F features a fully articulating 1.04 million dot 3″ touch screen LCD. The Fuji has a standard non articulating 1.04 million dot 3″ LCD screen. Some people love articulating screens others despise them. That’s up to you to decide what you prefer. I hope the Fuji X100T successor has a flip up screen like the X-T1. That would suit this camera better.
Winner – Draw
Olympus Pen F vs Fuji X100T – Features
The X100T features the last generation 16mp X=Trans II sensor while the Olympus Pen F sports the latest 20mp Micro 4/3 sensor from Sony.
In reality 20mp vs 16mp doesnt make a huge amount of difference and in my testing the differences were minimal and any perceived increase in resolution is more to do with the lenses used on both cameras than the resolution itself.
The Olympus Pen F also features the new colour wheel on the front of the camera.
This gives you direct access to customise your Jpeg output using the new black and white simulation modes, the new colour mode or the older Art modes. If you shoot Jpeg (and even if you don’t) you will love the new black and white (Tri X simulation) from Olympus. It gives a fantastic contrasty image. What is even greater is the ability the Pen F has given users to customise the look of the images.
You can change the tone curves, introduce colour filters as well as add a grain and vignette.
Shot on the Pen F using the black and white colour wheel
The Fuji X100T added the Classic Chrome simulation mode to the other film simulations offered but nothing in there quite offers the customisation of the black and white output available on the Pen F.
You can add colour filters (red, green, yellow) to the monochrome mode in the X100T but again the Pen f has more options here with Yellow, orange, Red, Magenta, blue, cyan, greenand yellow-green. You can also vary the strength of each filter in three steps.
I’m dying to get my hands on the new Fuji X-T2 to try out their Acros black and white simulation as it looks beautiful. Some of the images I have seen Damien Lovegrove produce with it are simply stunning.
The Fuji X100T is not really about features and all the bells and whistles. It invites you to simply concentrate on your images. You wont find image stabilisation, live time or live bulb modes as in the Olympus but for some this wont matter. However it does have some advantages which are perhaps more useful in general photography. The X100T has a leaf shutter which allows fast flash sync speeds even up to 1/2000. Why does this matter? It allows you to add fill flash in daylight and for brightly lit subjects when you can’t decrease your shutter speed to the usual flash sync speeds of 1/200 or 1/250.
It also has a built in ND filter. This again is great when shooting in bright light when you want to use large apertures. Normally you would have to add an ND filter to your lens to enable you to keep your shutter speed below the maximum. However the X100T has this feature built in. There are basically very few situations where you can’t get the image that you want with the Fuji.
The built in ND filter on the Fuji X100T allowed me to get this shot and still shoot at f/2
The Pen F on the other hand looks like a simple camera but in reality it is feature rich. The 5 axis image stabilisation built in to the body is the best that there is. It allows you to handhold shots at unthinkably slow shutter speeds and still get sharp shots.
One of the newer features (first introduced in the OM-D E-M5 II) is the High resolution mode. This combines 8 images in to 1 using sensor shift technology. Basically it moves the sensor a tiny amount between each image and then combines them in camera to give you an 80mb raw file or 64mb Jpeg. The detail that this produces is incredible and easily on par with 36mp full frame cameras such as the Nikon D810 and Sony A7R.
The only issues is that it is limited in use to still subjects and you need to have the camera on a tripod as the Image stabilisation doesn’t work at the same time. So any subjects with movement will not work in this mode. Uses I can see for it are architectural, still life, fine art and Art reproduction photography. I also noted that the colours produced by the camera in this mode were very rich and beautiful.
Winner – Draw
Olympus Pen F vs Fuji X100T – Auto Focus
Neither of these cameras are going to be useful for fast action or sports. The X100T’s auto focus is way too slow and the Pen F tracking is not up to scratch because there are no phase detection pixels. Instead it relies on contrast detection auto focus.
In reality no one in their right mind would buy these cameras with the intention of shooting wildlife or sports.
So in normal use which one is better and will give you more keepers?
Photos of moving subjects are easier to get on the Pen F
Simple, the Olympus Pen F wins here comfortably. In good light it is closer than you might think but the Pen F locks on faster and more decisively. Don’t forget that the Pen F also has a better implementation of face and eye detection auto focus. On the Pen F you can select face detection, eye detection, left, right or near eye detection and it works really well most of the time. It also has touch to focus on the LCD screen so you can touch where you want the camera to focus and it will take a shot with your subject in focus.
The Fuji has face detection too but doesn’t offer the customisation of the Pen F with no eye focus selection.
In low light both cameras can sometime hunt. In the case of the Fuji it can hunt back and forth and still not find it’s intended target. The Pen F is pretty good unless your subject has very low contrast, in which case it can sometimes fail to lock on.
Winner – Pen F
Olympus Pen F vs Fuji X100T – Image Quality
Olympus Pen F vs Fuji X100T
So we have an older generation 16mp X-Trans APS-C sensor against a newer generation 20mp Micro 4/3 sensor.
The new sensor in the Olympus Pen F is a slight improvement over the older 16mp sensor in previous Olympus cameras like the OM-D E-M5II but it’s not a huge improvement in terms of resolution.
In terms of IQ the Pen F combined with the Olympus 17mm f/1.8 produces sharper images than the Fuji. It is very close unless you shoot close to your subjects. Then the difference is greater as the 23mm lens on the X100T is known to be a little soft at close distances.
Fuji X100T shot on a tripodOlympus Pen F + 17mm f/1.8 Shot on Tripod using the same settings as the Fuji X100T
The Pen F definitely seems to perform better at high ISO with less colour noise than the OM-D E-M5II. The grain produced at ISO 3200 is small and quite filmic so I don’t mind shooting at up to ISO 3200 for some subjects. I think 6400 is too far for this format at the moment unless your output is on the web or small prints.
The larger sensor in the Fuji X100T naturally gives it an advantage here and around half to one stop advantage at high ISO. I would max the X100T at ISO 6400 but again only for some subjects.
In terms of colour you can check out my Micro 4/3 vs APS-C article to see comparisons. Both produce great Jpegs with very nice colours. Which you prefer is really down to the subjects you shoot and personal taste. I would say that Olympus and Fuji produce the best SOOC Jpegs in the industry right now.
Despite the difference in sensor size these two cameras are very close when it comes to image quality. However all things being equal the Fuji will produce shallower depth of field at the same aperture and handles high ISO noise slightly better.
The Pen F is more customisable if you are shooting Jpegs thanks to the fantastic new colour wheel at the front and the ability to tweak and perfect your output.
Winner – Fuji X100T
Please help me build this website so that I can keep reviewing gear. This site takes a lot of time to keep going and I can only do it with your help.If you want to buy anything from Amazon etc then please use my buying links. It wont cost you anything but I do get a small commission from Amazon.Thank you from me and my family to all of you who help
You can buy the Pen F through Amazon UK below
You can buy the Olympus Pen F through Amazon.com below
If I had to pick one as my only camera it would be the Pen F due to the fact that it is an interchangeable lens camera. This doesn’t mean it is a better camera than the X100T.
For instance I have owned the X100T for nearly two years and for some of that time it was my only camera. I would prefer to have the Fuji as a second camera. One that you always take with you and know you can still capture great images. If the 23mm (35mm equivalent) focal length suits you then it is a fantastic camera. There is also something pleasing about having a fixed focal length as it teaches you to see in that format and to use the camera that you have. You wont spend time worrying about which lens to use. You will just work out how to get the shot. With that said there are some occasions where you wont get the shot because you are just too far away from the subject or you are too close and can’t fit everything in. There is only so much you can do with one fixed lens.
If you are trying to decide between these two cameras based on image quality then check out my full resolution files on Flickr. If ultimate image quality is what you want then again the Fuji would just sneak it. But it is close, much closer than many would have you believe. Don’t forget that the Pen F has in built IS and you can add a fast lens which will negate the Fuji’s slight advantage at high ISO’s.
In the end the Pen F is the more well rounded camera with better auto focus, better build quality, in built image stabilisation and of course you can switch lenses to suit your needs.
The IQ of the Pen F is very close to that of APS-C and as you can see from my Micro 4/3 vs APS-C shootout it is more dependent on which lenses you stick in front of the camera. For example the Pen F + Olympus 17mm f/1.8 was sharper than the 18-140mm kit lens on the Nikon D7200 and indeed it is sharper than the Fuji X100T.
If you shoot at high ISO a lot then you would probably want to look at full frame because the differences between Micro 4/3 and APS-C are not huge. Check out my quick look at the Sony A7II for a full frame camera featuring in body image stabilisation.
In the end both of these cameras are great fun to shoot with and give excellent results. You can take great photos with either camera and you will have a lot of fun doing so without lugging around all the extra weight of a DSLR and a bag full of lenses. The fact they both look great is just an added bonus and who doesn’t like pretty stuff.
In this Olympus Pen F Review I shall build on my Olympus Pen F first impressions after having had the camera for quite a while now.
Olympus Pen F Review – Features
Lets take a look at what the Olympus Pen F offers in terms of features as the latest Olympus camera in the Micro 4/3 format.
New 20mp sensor which is the first resolution upgrade we have had in a long time for an Olympus Micro 4/3 camera. The new sensor gives and image size of 5184 x 3888 pixels compared with 4608 x 3456 found on the previous 16mp sensor in cameras lie the OM-D E-M5 II. These added pixels are always welcome as long as they don’t come at the expense of noise. In my testing I have found that the noise performance of the new sensor is slightly improved over the older sensors, offering less noise at base ISO (200) and similar noise performance at higher ISO’s such as 3200 and 6400. The benefit of the extra resolution is noticeable even at higher ISO settings where noise performance remains similar but retains more detail in shots.
5 Axis Image Stabilisation built in to the body. Olympus’ 5 axis IS is simply the best in the industry. It is a fantastic feature which allows you to hand hold shots at implausibly low shutter speeds. In my testing I found the 5 axis IS to not be quite as effective as that found on the OM-D E-M5 II probably because of the increased resolution of the Pen F. I can comfortably handhold at 1/2 second on the Pen F whereas I can do so at 1 second on the E-M5 II.
2.36 million dot OLED Viewfinder. The viewfinder on the Pen F is the same as that found in the Olympus OM-D E-M10 II. It is a very good viewfinder offering nice bright, clear view although slightly smaller than that found in the OM-D E-M5 II it is still very good in use offering a large enough view to clearly compose your photos.
10 FPS mechanical shutter and up to 20FPS with the electronic shutter. The Pen F is not built for fast action but with a fast 10FPS shutter speed it certainly ha no problems capturing the decisive moment.
Fully articulating 1.04 million dot 3″ LCD screen. The fully articulating screen on the Pen F is a pleasure to use. It can be folded back in to the body with the screen facing inwards to protect it from damage. This is also a useful feature for those that prefer to use the viewfinder. The LCD screen can also be used as a trackpad for auto focus when using the viewfinder. Simply slide your thumb across the screen to change your auto focus selection point.
50mp High res shot mode. This actually produces a 64mb Jpeg and an 80mb raw file. In practise it’s us is limited to static subjects but when you can use it oh wow the results are fantastic. The image is more detailed than any full frame Image I have seen and the colour detail and accuracy is improved too. Great for architectural, product and still life photography.
1/8000 mechanical shutter speed , 1/16000 with the electronic shutter. Thanks to the fast top shutter speed I have always found it possible to shoot wide open in bright light.
1080/60p video. Some of the product shots on my videos are shot with the Olympus Pen F and the video is clean and shows no artifacting. 4K would have been nice but this is a still orientated camera. Video with the Pen F and it’s 5 axis IS is great for being able to grab steady handheld footage.
Colour Wheel control dial givng access to fine tuning of black and white, colour and ART profiles. I’ll talk more about this later but for now I’ll say that this feature is a lot of fun to use and produces beautiful black and white photos.
Olympus Pen F Review- Build Quality
Firstly let’s go back over the build quality because I think this is worth re-stating as Olympus deserve some serious credit here.
Weighing in at 427grams and measuring 125 x 72 x 37mm the Pen F is a small camera but it doesn’t feel light or cheap.
The body itself feels solid, much more so than Fuji cameras. While the body is smaller than Fuji X cameras it is in the same ball park and actually feels heavier than the X100T for example. But it does not feel heavy in use, just reassuringly solid.
The Olympus Pen F offers fantastic build quality. Each knob and dial is well made, gives a solid feel and offers great tactile feedback when in use. The exposure compensation dial is certainly stiffer than that on the Fuji X series cameras and as a result it does not get easily knocked and ruin shots. It stays in place until you want to change it.
I’ve seen a lot of reviews saying there are no visible screws on this camera and this is true although I don’t know why so much is made of this. Perhaps Olympus wanted reviewers to mention this for some reason. While it’s true I prefer to note the high quality materials and feel of the Pen F. Magnesium alloy body, metal dials and a nice faux leatherette material wrapping the body for grip.
I like the on/off dial rather than a switch, the shutter dial feels great in use and as mentioned the exposure compensation dial has just enough resistance to stop unintended movements.
Olympus Pen F Review – Handling
Let’s be honest, we all buy Mirrorless cameras because we don’t want the weight of a DSLR system but that doesn’t mean we want to give up decent ergonomics and handling.
I found the camera to be comfortable in use. In fact it is a delight to use because of the way that Olympus has really thought about the design of the Pen F.
The thumb grip on the reverse gives plenty of purchase and due to its small size my ring finger sits under the base of the camera offering all the grip I need. What I also like is that on this model the strap lug does not get in the way as I found on my old OM-D E-M5.
The new front control dial which controls art effects and more importantly black and white output doesn’t get in my way at all. In fact it feels perfectly positioned to me. Ideally it would be customisable for those that don’t want or need to use the new dial as intended and perhaps Olympus will add this with firmware in the future.
You now have four custom settings on the PASM Dial which allows you to set up the camera to quickly switch to your favourite settings. The only issue I have with this is that the custom modes don’t allow you to switch between the black and white mode and colour modes. For example I wanted to have C1 assigned to my colour portrait settings, C2 for landscape shots and then C3 & C4 set to the black and white modes that I had tweaked with curves and filters. However if you are in standard colour mode on the front dial, changing to C3 will not take you into your black and white settings. You will still have to turn the colour control dial on the front.
All the buttons on the reverse of the camera offer decent feedback and as always with Olympus the camera is so customisable that you can set it up almost exactly how you want it.
The fully articulated LCD screen is bright and so useful when shooting street photography or from unusual angles.
Olympus Pen F Review- Image Quality
The Pen F is fast enough to capture fleeting moments with Kids
I mentioned in my first impressions post that the image quality looks about the same as previous 16mp Micro 4/3 sensors. However after having looked in more detail at the output I can now say that the sensor in the Olympus Pen F is an improvement in terms of detail captured and ISO performance. You wont notice it in every shot but when pixel peeping you can see more details in eyebrows, eyelashes and in the fine details of landscapes.
!00% Crop Straight Raw Conversion Lightroom ISO 500
100% Crop ISO 500 Jpeg B&W
100% Crop ISO 500 Jpeg
What also seems noticeable to my eye is the way that the new sensor renders colours. The skin tones produced by this camera are more accurate and the tonal transitions are softer and more subtle. Portraits on the Pen F are noticeably better than the OM-D E-M5 II.
Shot with the Olympus 17mm f/1.8
These small improvements are welcome although they alone might not justify an upgrade from any of the 16mp Micro 4/3 models.
ISO 3200 comparison between Olympus OM-D E-M5 II (left) and the Pen F
From my testing high ISO performance has improved around 1/3-1/2 a stop. What is more impressive is that the way the camera handles colour. Noise has improved with the Pen F showing less colour noise at high ISOs. Once you bump up the ISO the Pen F is also retaining more detail than the 16mp sensor found in the OM-D E-M5 II. The ISO comparison images were shot at night to show real world use rather than artificially bumping up ISO settings.
More detail is retained in the Pen F image at 6400 ISO (right) than on the 16mp sensor of the OM-D E-M5II
If you want to see full resolution files you can do so on my Flickr page
High Resolution Mode.
I’m not going to go in to too much detail here as I plan on writing a separate article on the high resolution mode.
So far it seems to work under very strict conditions. There must be no camera movement and no subject movement. When these conditions are met then the high resolution mode works very well. It easily out resolves the standard mode and improves colour accuracy.
Black and White Mode and the new colour Dial
Straight away I may as well tell you that this feature will be of no concern to those who shoot only in Raw format as it is only available for Jpeg shooters.
However I used to exclusively shoot Raw myself until recently and yet I find myself loving this new feature.
So what does it actually allow you to do?
Flick the dial to the black and white mode and you now have a whole host of customisation at your fingertips. Firstly there are three black and white profiles available. The first is a flat monochrome profile. The second (where the fun is) is a Tri X (ish) simulation offering bright whites and dark blacks. The third is an infra red like look. If you want to see how this works in operation then take a look at my Olympu Pen F vs Olympus OM-D E-M5 II video
Shot with the Olympus 45mm f/1.8
Once you choose your mode (we will go to mode 2) you then flick the rear switch and option to change the curves now appear. It is set to +6 highlights and -6 shadows initially. This gives a very contrasty look so I changed the levels to +4 Highlights, -3 Shadows and + 1 midtones. I found this to retain decent contrast but also offer better tonal transitions.
Flick the switch again and you now have the ability to add colour filters to the image via a colour wheel. You can alter the colour filter, Green, red, orange, blue, magenta, yellow green and also vary the strength in the 3 steps.
Next you have the option to add a vignette to your shots and vary the strength in 3 steps as well as add a film grain overlay to your images. This grain is scanned in from film according to Olympus so it is pretty realistic. Again you can vary the strength with three settings.
The sheer amount of options can be overwhelming at first but you soon work out what your favourite settings are and the controls are intuitive and quick to use. These modes are so much fun to work with. I am a fan of getting the shot that you want in camera as I no longer want to spend hours sitting at a computer editing my images. Therefore with all this control at your fingertips you can create almost exactly the image you want straight out of camera.
I’ve found the results to be very good once I toned down the in camera default Curves. This kind of control along with the what you see is what you get nature of electronic viewfinders virtually eliminates the need to post process your images. Some may want the extra control offered by post processing software but at the very least you can shoot Jpeg and Raw and have the best of both worlds. Let me say the whole process is very addictive and you might find yourself shooting more black and white photos as a result.
Shot Using the Blue Filter
My girlfriend has complained that all the photos I keep taking are black and white and this is entirely down to the Olympus Pen F and its new black and white modes.
Can you replicate this on other Olympus cameras?
I see a lot of people asking if you can replicate the same look on the OM-D E-M5 II or other Olympus cameras.
In my opinion it would take a lot of work to get close to the look that the Pen F gives you. Firstly the Tri X simulation is only available on the Pen F and no matter what I do on the OM-D E-M5 II I cannot replicate it with tone curves in the monochrome mode. Secondly you cannot vary the strength of the colour filter available on the E-M5 II and to add grain or vignetting would require time post processing the files.
B&W Mode on the OM-D E-M5 II
Basically if you want this feature or the look then you will have to get a Pen F. I’m sure you can get close with PP work but in the end the Pen F allows you to shoot the photos straight out of camera and it really is great fun doing so.
Olympus Pen F vs Olympus OM-D E-M5 II
So in my first impressions post I mentioned that I wanted to see if the Pen F is worth the extra money over the OM-D E-M5 II.
The added features of the Pen F, 20mp sensor, new processor, colour wheel, black and white profiles, extra custom modes on the PASM dial apart, they’re the same camera right?
Here is how I look at it. If you need weather sealing or budget is the primary factor then the OM-D E-M5 II will do most of what the Pen F can but it wont do it as quickly and it wont be as much fun.
Sure the OM-D E-M5 II viewfinder is bigger, I can’t say I noticed a huge difference in real world use. What I did notice is that the Pen F feels quicker in use with far less lag when switching between the LCD and viewfinder. The whole experience is quicker when using the Pen F.
Auto Focus is faster on the Pen F, the images you get are slightly better thanks to having more mega pixels, slightly better high ISO performance and there is something about the rendering of images on the Pen F which just makes the images more pleasing to my eye.
Here are the pros and cons of each
Pen F
There is no denying it is a beautiful camera
New black and white mode is a lot of fun and produces beautiful photos
Improvements in image quality
Speed of handling and auto focus is faster
OM-D E-M5 II
Weather sealed
Larger viewfinder
Cheaper
Feels better with larger lenses
If you are trying to decide between these two cameras then you really want to take a look at my video comparison and write up between the Pen F and E-M5 II
So getting back to the start of this Olympus Pen F Review, is the Pen F all style and no substance?
It is certainly a stylish camera but some have bemoaned the lack of weather sealing and the price. It is undoubtedly one of the most stylish cameras currently available but I couldn’t ever justify keeping a camera for its looks alone. The price is the price, only you can decide if it is worth it to you. It certainly is for me.
Weather sealing would be nice but then how often do we really use it. A light shower is no problem to any camera that I’ve owned for years and are you really going to be out shooting in a torrential downpour even if a camera does claim to be weather sealed. The lenses that best suit the Pen F are in my opinion small light primes and these aren’t weather sealed anyway so having a weather sealed body makes no sense. I think Olympus probably knew that when they made their design decisions.
The Olympus Pen F has enough to keep even the most demanding enthusiasts happy. The new 20mp sensor is an improvement over the older 16mp sensors in almost every way. The camera operates more quickly, focuses faster and offers the ability to customise your out of camera jpegs beyond anything else on the market.
Add to this excellent build quality and a great range of small fast lenses which are available for Micro 4/3 and even at the asking price it is still a great camera.
If I had to choose between this and the OM-D E-M5 II it’s simple, I’d get the Pen F for the improvements in image quality, operation and a huge boost to the fun factor of using this camera.
Keep checking back on this review because I will add more images as and when I have them. I shall also add more hi resolution shots to Flickr. I also have a quick video which shows how the black and white mode works and will upload that as soon as I have a decent internet connection.
Please help me build this website so that I can keep reviewing gear. This site takes a lot of time to keep going and I can only do it with your help.If you want to buy anything from Amazon etc then please use my buying links. It wont cost you anything but I do get a small commission from Amazon.Thank you from me and my family to all of you who help
The Pen F is available fom Amazon UK here
and for international visitors the Pen F is available from Amazon.com here
So I have now had chance to try out the Olympus Pen F and the OM-D E-M5 II briefly although I haven’t taken them out on any serious shoots yet. Here are my first impressions. The Olympus Pen F is small but surprisingly a little taller than the EM5 II. Size wise it feels similar (slightly smaller) to the Fuji X100T although the Olympus 17mm f/1.8 is a little larger than the X100T’s fixed lens. It also feels a little heavier than the Fuji X100T and EM5 II. Build quality is superb. Both the Olympus Pen F and the OM-D E-M5 II make the Fuji cameras feel like toys. The dials and buttons are way better than the Fuji cameras in terms of build quality, materials used and tactile feedback. The Olympus Pen F feels very comfortable to hold, even without a grip attached. It has a nice heft to it. I’m very impressed with this cameras build quality and feel. I don’t find the front dial to get in the way or feel uncomfortable when shooting like some people have reported. Features I spent over a day acquainting myself with this camera and setting it up how I felt best. There are an incredible amount of customisation options which can feel a little overwhelming at first. The 20mp sensor seems to produce pretty much the same image quality as the older 16mp micro 4/3 sensor. I’ll have to do more serious tests but thats my initial impression. High ISO performamce seems around the same as previous micro 4/3 cameras. No great leaps in image quality here by the looks of it. The viewfinder is clear, bright and responsive. The button layout is excellent and highly configurable as always with Olympus cameras. The single shot auto focus is super fast. Easily as quick as the Nikon D7200. I haven’t tested tracking af yet. When comparing it to the Fuji X100T in any light it is no contest. The X100T is slow and ponderous in comparison. In low light the Pen F focuses confidently while the Fuji hunts back and forth. I can take shots of my daughter almost instantly with both Olympus cameras while I miss the shot a lot of time with the X100T. The camera feels more responsive and faster in use than the E-M5 II. There is hardly any delay when switching between functions, menus and importantly the rear screen and viewfinder.
Olympus Pen F Black and white modes
So far in my test shots I love the output of the new B&W Jpegs. I’ve toned down the contrast slightly from its original settings and the look that the files have are beautiful. What I also really like is the ability to add colour filters and vary the strength. In the shot below I added a blue filter to bring out the texture of the wood. High resolution Mode We all know the limitations of the high res mode but under the right conditions it definitely produces a lot more detail and improves colour rendition too. I’ve got some samples of this that I’ll add to the full review once I’ve had more time with the camera. Overall the Pen F feels like a great camera and I’m excited to test it thoroughly. Similar to the X100T, it makes you want to pick it up and shoot which is always a great quality for a camera to have. Please help me build this website so that I can keep reviewing gear. This site takes a lot of time to keep going and I can only do it with your help.If you want to buy anything from Amazon etc then please use my buying links. It wont cost you anything but I do get a small commission from Amazon.Thank you from me and my family to all of you who help.
Following on from Hassleblads X1D mirrorless medium format announcement earlier in the year Fujifilm have announced their long rumoured and much anticipated venture in to mirrorless medium format with the GFX50s.
The GFX50s has a 51mp 43.8x 32.9 sensor which is 1.7x larger than full frame DSLR’s yet the body is around the same size as a professional level body from Canon or Nikon.
We are super excited to get our hands on one of these and see if Fuji have translated their X series know how in to the medium format world. With Fujifilms long history with medium format and their refined APS-C X series now maturing in to great all around cameras with the recently released X-Pro2 and X-T2 this might be the mirrorless medium format system to change the game.
Fujifilm also announced 6 lenses will be released during 2017 which is certainly a good start to the G system.
They claim that the camera and 63mm f/2.8 along with detachable (but included in the box viewfinder) will come in at ‘well under $10,000 US’.
For us ‘well under’ would be around the $6-8000 dollar mark so we will have to wait and see how the pricing works out. At the 6-8k mark we think it will seriously tempt affluent amateurs and professionals alike but if it’s pushing $10,000 it might be a bit much to open up a new demographic to digital medium format.
What interests us the most with this announcement is to see the rendering of those superb Fuji colours from a medium format digital sensor.
The camera should be available at the start of 2017 alongside the 63mm f/2.8 (50mm equiv) , 32-64mm f/4 (25-51mm equiv) and 120mm f/4 (95mm equiv), 110mm f/2 (87mm equiv), 23mm f/4 (18mm equiv), and 45mm f/2.8 (35mm equiv).
If as some have suggested the body could retail around the $4000 US mark I think it will gain traction very quickly. I will certainly be interested to see if it is worth investing the money and having APS-C X series for everyday use and the G series for more professional applications.
Especially when you look at the size of it next to a Nikon D810.
For some time now Fuji photographers in particular have been wondering if a mirrorless medium format camera was coming to us. We ll it looks like Hasselblad have stolen Fuji’s thunder having just announced the 50mp medium format Hasselblad X1D.
Featuring the same 43.8×32.9mm sensor that is used in the 50c backs for the H6D but with new processing allowing for up to 25600 ISo which is extremely high for medium format.
One of the other main features that we are excited about is the flash sync speed of up to 1/2000.
The new camera also features dual SD cards, weather sealing and a touch screen.
With a price coming in at just under $9000 US dollars this really could bring medium format to a whole new group of users and with rumours of a more affordable Fuji medium format camera possibly arriving at Photokina this year medium format might be about to become mainstream.
In this Fuji X100T review I’ll talk about how I have found this camera in real World use having used it for nearly two years.
The Fuji X100T builds on the previous success of the X100 and X100s series with the same 16mp X-Trans sensor, a fixed 23mm f/2 lens (35mm equivalent focal length), aperture control ring and lots of physical dials for a rewarding range finder style shooting experience.
The Fuji 100T was announced in September 2014 and we have been using it for general shooting and travel photography since its release date.
In our Fuji X100T review we uncover the good and the bad about this popular enthusiast camera.
New to the X100T is the ability for exposure control in movies as well as 1080p video at 24, 25, 30, 50 and 60p. However more noticeable to stills photographers is the upgrading of the aperture ring on the lens to accommodate 1/3 exposure increments, the new Classic Chrome film simulation and the new hybrid viewfinder which offers both electronic and optical views and the choice to have a small overlay image of the in focus area at the bottom corner of the viewfinder.
We have had the chance to use the Fuji X100T for general travel photography in Europe and Asia, shooting some casual landscapes and some model shoots which has enabled us to get a real feel for the camera over an extended period of time. This review will give a real feel for the new features but also what it is like to live with this camera day in and day out for a long period of time.
Fuji X100T Review – Design and Handling
The Fuji X100 series of cameras offer range finder style photography and aim for simplicity when shooting. However this doesn’t mean that they are simple cameras.
In the hand the Fuji X100T feels very light and compact (in comparison to DSLR’s) yet solid enough to not feel like a plastic toy. It measures 127x74x52.4mm and weighs in at 440gm. Although quite small it is too large to be slipped in to normal size pockets but the weight is negligible if slung on your shoulder with the strap all day. Size wise it is very similar to the X-T1 although of course the X-T1’s weight can vary considerably depending upon the lens used.
Here is the Fuji X100T compared with a Nikon D7200 + 50mm f/1.4 lens
The design is elegant and aesthetically pleasing. Although this might not be important for everyone it is always appreciated by us when we get to use a camera that feels good and looks good too. It has the feel and look of a classic camera from the film era and we found that most people we encounter appreciate the design and styling. The camera is available in black and silver/black combination.
You can purchase through my Amazon UK links here at no extra cost
For US and international readers here are the Amazon.com links
We have the silver version although some street photographers prefer the black version to avoid unwanted attention. We have never found this camera to garner too much attention when street shooting though. This is mainly due to it’s small size as most people probably think it’s a cheap little compact. That’s also good if you are in a crowded place and don’t want it getting the attention of thieves.
The Fuji X100T is not weather sealed unlike the X-T1 but it feels well made with the top and bottom being of magnesium alloy construction. The hand grip on the fornt protrudes very slightly although we do find it a little small to give real confidence while holding it. However it is a light camera so it tends to nestle into the palm of your hand when shooting allowing for decent if not confidence inspiring grip.
The buttons on the back offer a clear click when pressing them, allowing for tactile feedback when shooting with your eye to the viewfinder. However they are a bit on the small side, especially the control wheel.
On the top we have the much talked about control dials. There is an exposure compensation dial offering +/-3ev. This is the one dial that could benefit from being a little stiffer in our eyes as it had quite often changed position when we took the camera out of our bag. Therefore we would recommend checking this every time you take it out of your bag.There is also a function button which by default is set up to record video although it can be customised as can 6 other fn buttons.
The Lack of an ISO dial on the X100T didn’t prove to be an issue for us.
The X100T also has a shutter speed dial with full stop increments from 1 second- 1/4000 in addition to bulb and timer mode. To make less than one stop adjustments to shutter speed you adjust the small control wheel on the top right of the rear of the camera. Lastly on the top plate we have the on off switch which can be a little awkward to quickly engage as the grip does not protrude quite far enough. It does have a thread for a shutter release cable which is a welcome addition. Note there is no ISO dial on the Fuji X100T unlike its sibling the X-T1. However in all honesty we don’t really miss it as auto ISO allows for setting minimum shutter speeds to compensate so we leave it in auto for the most part.
The rear of the camera has the viewfinder (which we shall discuss later) as well as view mode button to switch how the viewfinder/LCD screen behave when shooting. Playback button, Delete button and a further Fn button. Above and to the right of the LCD screen we have the drive mode button as well as the control dial which we mentioned earlier (used for adjusting shutter speed in 1/3 stops and can be clicked to zoom in when manually focusing).
On the right of the LCD is the AEL/AFL, Q menu and Display buttons as well as the control dial and menu buttons.
In general we like the ability to customise up to 7 of these buttons to do a whole variety of functions rather than just the default functions. For instance we set the delete button to switch the built in ND filter on and off, the up button on the control dial to turn face recognition auto focus on, right button for flash exposure compensation, down to adjust focus points and left to quickly access the different film simulations. The number of different combinations is exhaustive and allows for each user to set the camera up pretty much how they like.
The Fuji X100T has 7 customisable function buttons
On the left hand side of the body is a switch to swap between single shot, continuous and manual focusing modes.
The Fuji X100T has a Type D HDMI Micro connector, Micro USB port and a new 2.5mm microphone input; the mic input and USB port can be used with optional remote controls and the USB port can be used for charging which is great when travelling with several cameras as you can cut out the bulk of all the various different camera chargers. The Fuji X100T does of course, come with its own AC power charger.
Along with an external flash hot-shoe the Fuji X100T has an internal flash and we found it to be much better than the average in built DSLR flash at providing subtle and usable fill flash for portraits. It can be set to various modes including slow sync which is perfect for getting correctly balanced exposures with -2/3 FEC dialled in. What should also be noted is the ability of the X100T to hit flash sync speeds of up to 1/4000 thanks to its leaf shutter. This makes it easily able to shoot with fill flash in bright conditions which is a huge advantage over the X-T1 as well as all DSLR’s unless an external flash is used. We almost always use fill flash when shooting outdoor portraits with the X100T as it seems to nail the exposure and give natural results 99% of the time.
The leaf shutter allow for fast flash sync speeds and shooting at large apertures in bright light thanks to the built in ND filter.
Once you have taken a shot it is also quick and easy to transfer those files to your smart device thanks to the in built wifi of the X100T. While the Fuji app is not the best it does the job and we could transfer over full resolution Jpegs ready for upload to social media. There is an annoying limit of 30 images per transfer but this is a minor inconvenience. The app also lets you remotely control the camera although not shoot video which is a shame.
Fuji X100T Review – Viewfinder and shooting experience
The viewfinder in the Fuji X100T is clearer than the previous models. When using the optical viewfinder the X100T displays a bright and clear electronic overlay which shows, the active focus point, shooting settings such as shutter speed, ISO and aperture as well as a rectangular marker which indicates the actual area of your image corrected for parallax. Because the viewfinder and the image sensor are not in line as on a DSLR what you see straight through the viewfinder is not exactly what will be recorded on the image. This parallax correction is therefore really useful to avoid hidden surprises in your final composition and image.
The switch (left of image) is used to switch between OVF and EVF.
Flick the switch on the front of the camera and the X100T viewfinder changes to wholly electronic view. The refresh rate is fairly quick and although there is a little lag compared with an OVF we generally preferred to shoot with the EVF because it shows in real time adjustments made to the exposure before you take the shot. We just find EVFs in general a great artistic tool as you can see your image before you click the shutter. Any changes to the film simulation are reflected in the EVF so it reduces the need to chimp images after the fact. The only exception to this would be when shooting faster moving subjects which can benefit from the real time view of the OVF.
On the whole the electronic viewfinder is on par with others in the mirrorless world like the FUji X-E2s and Olympus OM-D series.
What is new on the Fuji X100T is the addition of the electronic overlay for focusing when using the optical viewfinder. When using the optical viewfinder flick the switch on the front of the camera to the left and a small rectangular electronic over lay pops up in the bottom right corner showing the in focus area. You can click the rear control dial to zoom in and now manual focusing becomes ever so easy. Add to this the manual focus aids found on the FUji X100T like focus peaking and it gives the ability to quickly and easily achieve manual focus.
In general shooting we found the X100T’s auto focus to be a notch faster than the X100s although not quite on par with the X-T1. If you are shooting portraits, landscapes and general travel photography then the auto focus in good light is quick enough to keep up.
Where we did have a few issues was when shooting moving subjects such as kids or pets. Here we found a relatively high rate of out of focus shots simply because the auto focus could not attain focus before the subject had moved on slightly. This can be frustrating but if you shoot a lot of moving subjects then it would be wise to look at other mirrorless options like the Olympus OM-D E-M1, Fuji XT-1 or Sony A6300.
The auto focus got confused here and resulted in focusing on the wrong subject.
Every time we look at the Fuji X100T it makes us want to pick it up and shoot. It’s size combined with its excellent image quality mean that we feel like taking it with us everywhere we go without worrying about the weight and size. So how about the image quality. Well lets take a look at that in more detail in the next section. Click the link below to see the results for image quality and some sample images.