For some time now Fuji photographers in particular have been wondering if a mirrorless medium format camera was coming to us. We ll it looks like Hasselblad have stolen Fuji’s thunder having just announced the 50mp medium format Hasselblad X1D.
Featuring the same 43.8×32.9mm sensor that is used in the 50c backs for the H6D but with new processing allowing for up to 25600 ISo which is extremely high for medium format.
One of the other main features that we are excited about is the flash sync speed of up to 1/2000.
The new camera also features dual SD cards, weather sealing and a touch screen.
With a price coming in at just under $9000 US dollars this really could bring medium format to a whole new group of users and with rumours of a more affordable Fuji medium format camera possibly arriving at Photokina this year medium format might be about to become mainstream.
Having read our Canon 80D review, is this the camera for you?
The Canon 80D has improved on previous models in the series in some important aspects, not least of all image quality.
We welcome the new 24mp sensor which puts it on a more even playing field with it’s rivals from Nikon and Sony. The added resolution while not that noticeable and certainly not a deal breaker is always welcome.
What we like most about the new sensor is the improved dynamic range and the roughly 1 stop of extra high ISO performance. More importantly it allows 80% of the sensor to be used for the Dual Pixel Cmos AF.
The physical controls and handling of the 80D feel well refined and so they should after all these years. With the exception of the placement of the on/off switch and the rear control dial we can’t really fault the handling of the 80D. We also like the build quality as it feels like a solid tool that can stand up to plenty of abuse. It may not quite be in the same league as the Canon 7D MKII or Nikon D500 but at this price point it is certainly solid enough.
It would be nice to see dual card slots on the Canon 80D
The lack of dual card slots is disappointing, especially for professional use as having in camera back up is a great feature for pros.
The image quality is good but not mind blowing, the Nikon D7200 produces sharper images thanks to the lack of AA filter and the Sony A6300 images are better too in terms of dynamic range and high ISO performance.
We are a little disappointed that Canon did not implement 4k video on the 80D but then 1080 is all that a lot of people feel they need at the moment. However when Canon’s competitors offer it at around the same price point it may be wise for Canon to match it.
The actual video quality from the Canon 80D at 1080 is good and relatively free from artifacts and moire. Rolling shutter is also reasonably well controlled although as with the competition if that is a real issue for you then better to look elsewhere.
So it sounds like we don’t really rate the Canon 80D as being great for any one particular feature and that would be fair to say with the exception of Dual Pixel Cmos AF which is genuinely superb.
Yes the Nikon D7200 has better image quality and tracking focus for stills and the Sony A6300 offers better video quality.
However if you need a camera that shoots good stills and decent video then we would recommend the Canon EOS 80D over and above both of those cameras due to the following features. . The stills are good, the video is good, the auto focus in video is the best that there currently is, it handles nicely, has an articulated touch screen, is well built and allows you to use Canon’s vast range of native lenses.
Canon 80D vs Nikon D7200
The Nikon D7200 has a few advantages over the Canon 80D which will be particularly important to stills photographers. The lack of AA filter offers sharper images with more detail. The high ISO performance and dynamic range is also better. The Nikon D7200’s 3D tracking auto focus also works better than the Canon equivalent, offering better target acquisition and retention giving you more keepers.
In the Canon 80Ds favour are better movie auto focus thanks to dual pixel Cmos AF and a fully articulated touch screen which really does make shooting video very easy and intuitive. Touch to focus makes pulling focus incredibly easy and Dual Pixel Cmos AF is easily the best video focus system currently available.
Canon 80D vs Sony A6300
In the 80D’s favour are 100% coverage optical viewfinder, articulated touch screen, better ergonomics, much better battery life, better native lens selection, better choice of external flash accessories.
In favour of the Sony A6300 is most importantly 4k video, slightly better still image quality, small size and weight, faster FPS at 11 vs 7 for the Canon.
As a camera we prefer the Canon 80D due to its usability but there is no denying that on paper the Sony offers the better specs.
Here are our recommendations:
Stills only photographer with no current investment in lenses –
Get the Nikon D7200 for better image quality and auto focus.
Existing Canon users-
Get the Canon 80D over the Nikon D7200. It’s close enough in stills performance and offers better video.
Video Users-
If you don’t need 4k video then the 80D is a good choice, not just because it offers decent video quality but it is the usability of the 80D that makes it a good choice. The articulated touch screen along with dual pixel Cmos AF really do make shooting video a breeze.
If you need 4k then look at the Sony A6300, A7SII, A7RII or Panasonic GH4.
The closest rivals to the Canon 80D are Canon’s own top of the line APS-C 7D MK II and Nikon’s D7200. While the Canon 80D can’t compete with the 7d mk II’s 10fps shooting speed it does get quite close at 7fps.
Is this good enough to negate the need to splash out more cash on the 7d MK II. It also offers a 1 fps advantage over the Nikon D7200 so is it better for rapid shooting than its Nikon rival.
Also of interest is that the 80D now offers a 45 point focus system (all cross type) and can focus down to -3ev. This is quite a significant upgrade from the 70d’s 19 point focus system which also only focused down to -.5 ev.
We did some basic testing with the 80D and Nikon D7200 side by side to get a feel for the performance of the two.
The Canon 80D was set to high speed mode with tracking auto focus enabled and the sensitivity of the auto focus set to its default level.
The Nikon D7200 was set to high speed mode with 3D auto focus.
We found that the 80D’s 7fps shooting rate seemed significantly faster than the D7200 in use. It felt faster and more fluid and on top of that we were able to take about 50% more photos with the 80D before the buffer filled up. One of the issues we found with the D7100 a few years ago was that it had a really small buffer which hindered shooting lots of photos at high fps in raw.
The D7200 hundred has improved in this area but the 80D is noticeably better.
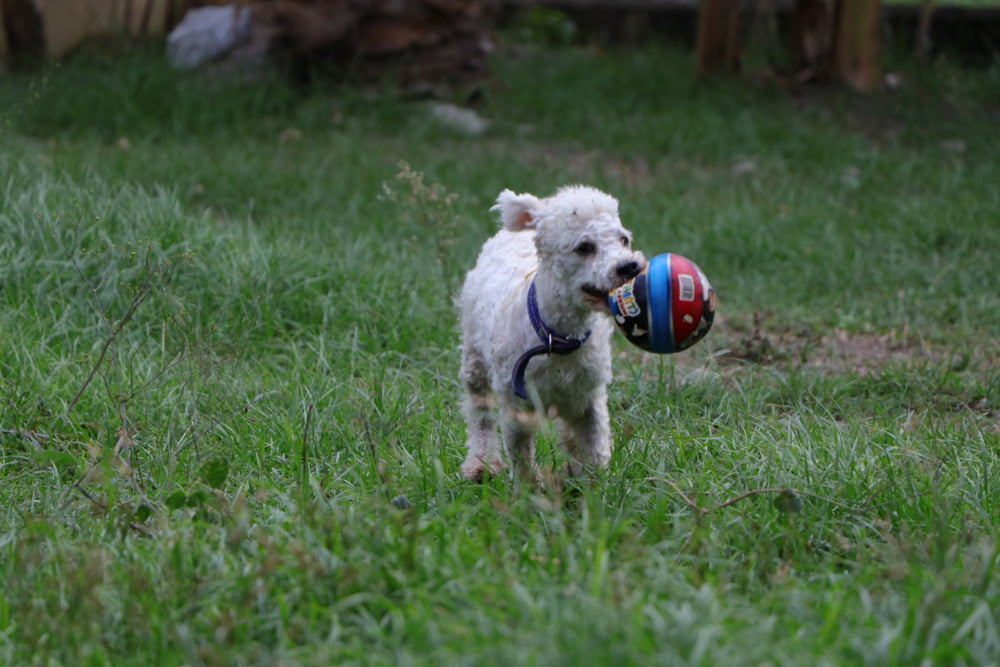
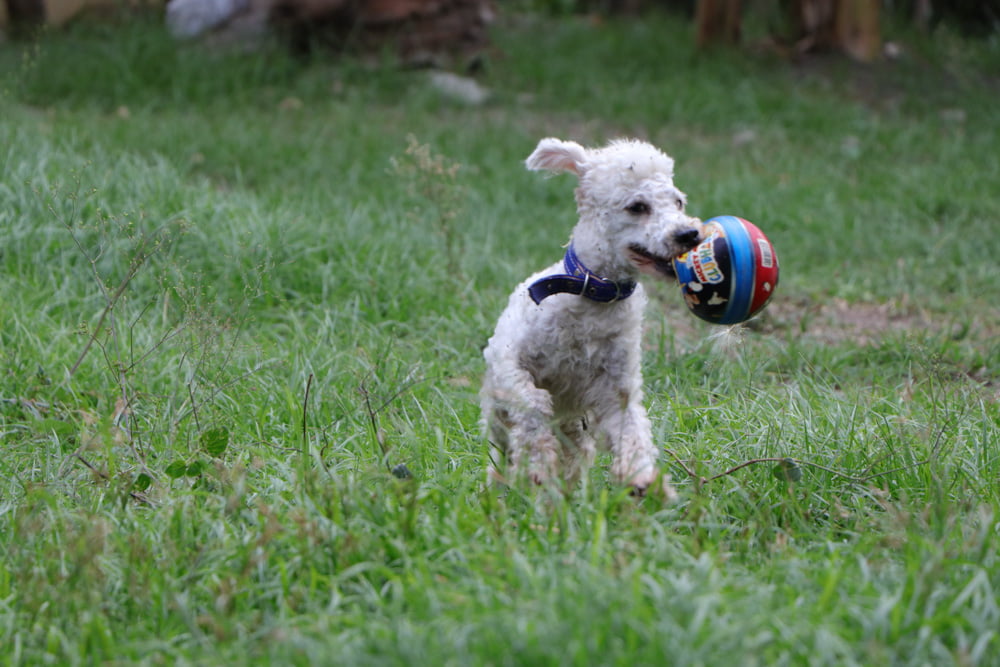
However when it came to auto focus accuracy when tracking a moving subject the Nikon D7200 performed better than the 80D. With the Nikon shooting a burst of 10 photos of our scruffy little poodle running at us it managed to get 8 shots in focus. The 80D only achieved a score of 6 images in focus. We repeated this test several times, always using the 18-135 Canon kit lens and the Nikon 18-140mm kit lens supplied with the D7200 and found the results to be similar each time.
Canon 80D Auto Focus
Nikon D7200 Auto Focus
In conclusion if good fast tracking auto focus for stills is important to you then you may be better served by the Nikon D7200 or better still either the 7D MK II or D500.
Although we didn’t run side by side tests of the 80D vs the 7D MKII we have used the 7D Mk II a lot previously and while the 80D put in a decent performance it is simply not in the same league for fast action as its bigger brother. The 7D MK II has a separate auto focus section within the menu which allows for a variety of customisation not available on the 80D.
The spread of the auto focus points on the 7D MK II is larger and you are given more options to fine tune the system. It is also more responsive and accurate. From out testing the 7D MK II achieved hit rates of 80-90% on moving subjects. Combine that with 10fps shooting and it clearly bests the 80D.
However most people who want or need to shoot fast action will in all likelihood already be looking at the 7D MK II or the new Nikon D500. However the 80D is no slouch and compared to mirrorless offerings the system is fast, responsive but perhaps not quite as accurate.
Video Performance
What the 80D does offer is a competitive stills camera while also being a very nice video camera. The combination of an articulated touch screen with Canon’s Dual Pixel CMOS AF technology makes shooting videos a breeze.
Flip out the LCD screen and simply touch to focus and the response from the camera is very fast, quickly moving the desired part of the image in to focus. The new 18-135mm Nano lens is fast and quiet while focusing.
Check out our quick video below to see touch to focus in action.
When put in to tracking mode the auto focus can keep up with steadily moving objects such as a presenter walking through a scene without hunting back and forth for focus and ruining the shot.
The combination of the above technologies puts it way ahead of the D7200 if you shoot video as the performance of the Nikon auto focus in video is sketchy at best and of course, there is no articulated screen. The 7D MK II actually focuses better than the 80D for video but the articulated touch screen makes the 80D a better, more usable choice for video overall.
The Canon EOS 80D offers mic in and headphone out jacks which adds a level of professionalism to those more in to creating video but the lack of 4K video at this price point when competitors like the Sony A6300 offer it is disappointing.
There is also no truly flat picture profile although we found shooting in Canon’s natural picture profile with sharpness, contrast and saturation all set to their minimum settings gave a fairly flat image that could be graded in post quite nicely.
The video coming out of the 80D at 1080 24p is good if not mind blowing. It doesn’t suffer with major artifacts and is clean. However video from the Panasonic GH4 and Sony A6300 is sharper and in the case of the latter, holds together better at high ISO’s. Don’t forget that with those two cameras you can also shoot in 4k and down sample the video to a 1080p timeline and get even sharper looking video too.
Even though other cameras offer more in terms of video image quality and indeed functionality the 80D is a nice tool when creating video thanks to its articulated touch screen and the fact that you can use the vast range of Canon EF lenses without having to mess around with adapters (albeit EF lenses will be subject to a crop factor of 1.6x on the 80D body).
Image Quality
One area where Canon seem to have been overtaken recently is image quality. This all started with the Nikon D810 a couple of years ago offering a 36mp sensor and improved dynamic range thanks to Sony’s sensor technology. Canon’s high ISO performance was also lacking so have they managed to catch up with the new 24mp APS-C sensor in the 80D or not.
We have now been shooting the Canon EOS 80D for around a month and in that time we have come to appreciate the new sensor. It is an improvement over the older 20mp sensor found in the 7dMK II in terms of high ISO performance and dynamic range and it offers a small improvement in IQ thanks to the jump up from 20 to 24mp.
Below are samples of some portraits taken with the 80D. They were shot in Raw and Jpeg using window light and just the on-camera flash for a little fill light. The aim was to shoot some nice high key shots and we found that the 80D did a decent job. The full resolution files are available on Flickr
Canon 80D Portraits
Here is a straight conversion of the original Raw file and a 100% crop of the same file. The image was shot with the new 18-135mm nano lens at f/5.6, 1/160, ISO 500 and shows good detail thanks to the new 24mp sensor.
Here is an image that we deliberately over exposed and then in post attempted to recover the highlights by reducing the exposure by 2EV
Un-Edited Jpeg intentionally over exposed.
Raw file of the same shot with highlights recovered by 2EV in Lightroom
As you can see the 80D did a pretty decent job of recovering the hghlights but there are areas where there is significant loss of detail such as in the curtain in the centre of the image. It does show that if you accidentally clip the highlights a little then there is some headroom for recovery with the new sensor.
Below is a shot which was underexposed and Lightroom warned of blocked shadows in the subjects hair.
Shot at ISO 100
And here is a crop from the top of the hair with the image pushed +3EV
Shadow Recovery is definitely an improved area with the new sensor
We are pretty impressed with the 80D’s ability to push the shadows by +3EV and still retain detail without much noise at all. For landscape photographers in particular this marks a significant improvement over previous Canon sensors which would introduce noise trying to perform similar tasks. For landscape photographers in particular this will give the ability to shoot to ensure no clipped highlights and simply push the shadows as required in post, giving a boost to dynamic range.
Noise performance
One area we were interested in was how the new 24mp sensor performs at high ISOs in real world situations. You can shoot all the test charts you want but it is in the real world that we see the true performance available.
Below are a few samples shot at high ISOs.
Raw shot at f/2.5 , 1/125, ISO 6400100% crop of the above image
As you can see from the cropped image at ISo 6400 we are still getting pretty usable files. There is some noise but it is not objectionable and in fact the noise pattern is quite pleasant. This image is an unedited raw file so with a tiny bit of luminance noise reduction in Lightroom we would have no problem using this image. One thing we did notice was that under indoor lighting the Canon 80D’s white balance tended to oversaturate the red channel so we would advise shooting in Raw to easily correct this in post.
Below is another raw image at ISO 6400. We have shown a 100% crop with no noise reduction and then a further one with just 25 of luminance noise reduction in Lightroom to show the results you can easily obtain. Note the white balance is over saturated in the red and magenta channels again.
f/2.5, 1/100, ISO 6400 Unedited Raw100% Crop of the above ImageSame as above with +25 Luminance NR in Lightroom added.
From our testing we think the sensor in the Canon 80D provides about a 1 stop advantage in high ISO performance over the 7D MK II.
Here is another example, this time at ISO 3200
f/4, 1/160, ISO 3200, 100% crop no PP
Below is a gallery of SOOC Jpeg images we shot with the 80D. These and more are available on our Flickr page
The Canon EOS 80D is a mid range DSLR featuring a new 24mp APS-C sensor, 7 FPS continuous shooting along with a 45 point AF system and full HD 1080/60p video.
The Canon 80D comes about 3 years after the 70d which is in line with Canon’s standard release schedule with XXD bodies.
The Canon 80D is a step up from entry level cameras offering a more fully featured body and better build construction for those seeking more control while not wanting the size, weight and cost of professional DSLR’s.
The most interesting points of note with the Canon 80D is the new 24mp sensor which promises better resolution, low light performance and importantly for Canon when competing against Nikon’s D7xx series bodies, better dynamic range.
The new 24mp sensor like that of the 20mp 70d employs Canon’s dual pixel CMOS AF technology allowing 80% of the pixels on the sensor to act as phase detect AF points. This in theory allows for smooth continuous AF in live view and video mode. It has been upgraded from the 70d to work with all lenses and all video quality settings. We will take a look to see what the updated technology has to offer.
The new 45 point AF system now features all cross type AF points, with 27 working at F/8 and all of them now focusing down to -3EV. Along with a fully articulated touch screen and WiFi the 80D now features NFC for quick connections to smart devices.
We tested the Canon 80D alongside the new 18-135mm Nano USM kit lens which is supposed to offer both the speed and smoothness of focusing of STM lenses for movies while keeping up with USM lenses for Stills.
Build Quality and handling
Having used a Fuji X100T for a lot of shooting in recent years there is something substantial and reassuring about handling the Canon 80D. There is no doubt that the ergonomics of a DSLR are pretty much near perfect when it comes to photography.
The camera feels very solid in the hand yet it doesn’t feel too heavy to shoot for extended periods of time. The grip is substantial and allows you to confidently hold the camera in one hand, something not always true of mirror-less bodies.
The first thing we notice about the Canon 80D as we switch it on is that it has retained the position of the on/off switch on top of the body just behind the PASM dial. We hate this position a it prevents us from turning the camera on while holding it one handed (ala Nikon bodies). However it is a small gripe as once turned on you can just leave it that way and rely on the camera to enter sleep mode to save battery life. The battery used for the Canon 80D is the same as all the newer Canon bodies, the LP-E6N 1865 mAh. Our first charge gave us 686 shots but that included a lot of playing with the menus and setting up the camera as well as shooting numerous short videos. Our subsequent charges gave us around 1000 shots each time. More than enough for a days shooting.
With the new 18-135mm Nano USM kit lens attached the camera feels well balanced and at 730g it is substantial but doesn’t feel overly bulky like the 7D mk II (910g) can.
If you are used to shooting Canon bodies then the 80D will feel reassuringly familiar with similar button layout. There is no AF joystick which you get on the 7dmkII but instead we have the ability to use the articulated touch screen for quick focusing in video and live view modes. However that doesn’t help when shooting stills through the optical viewfinder.
On the top of the camera body we have the display screen giving quick access to your settings along with dedicated buttons to change AF, Drive modes, ISO and metering, as well as a button to light up the display. A little further forward we have the control dial and a further button to quickly change focusing mode. In front of that is the shutter release button.
All the buttons feel well made, solid and give positive tactile feedback for easy use with your eye to the viewfinder.
The only issue we have with the controls are the on/off switch placement (as previously mentioned) and the D-pad on the rear of the body which is somewhat obstructed by the control wheel around it. It just doesn’t feel natural when using it as the wheel is a little too deep and obstructs your thumb from getting purchase on the D-pad.
Taking a leaf out of Fuji’s book we have a Q button on the reverse which gives quick access to your most regularly used features and functions. We really like this as we can quickly change settings without having to either delve in to the menus or use Canon’s customisable My Menu tab, which lets be honest is a bit rubbish.
Dedicated live view/video button, AF-on, zoom, playback . delete, control wheel lock, menu and info buttons round out the layout on the back of the camera body.
The mode dial on top now features two programmable custom modes which is always a welcome feature.
The new viewfinder is crisp, clear and now offers 100% viewfinder coverage, up from 98% on the 70D making composition much better with the 80D. It also offers diopter adjustment, always good for users of eye glasses.
The Canon 80D like its predecessor features a fully articulated touch screen. Some people bemoan articulated screens however we really appreciate them. It is easy to underestimate just how useful they are for composing shots in unusual angles and combined with the touch screen it is a fantastic tool and one that video enthusiasts in particular will appreciate.
If you don’t like an articulated screen (and we don’t know why you wouldn’t once you have used one) you can simply flip it in to the body, screen facing out and use it as a standard fixed screen. Alternatively if you are shooting using only the viewfinder you can close the LCD altogether with the glass facing the body and know that it is protected from scratches and damage.
The articulated screen is very flexible in terms of how you choose to use it.
We found the articulated screen one of the best features of the 80D and wish that Nikon would implement it on their D7xx series of bodies.
One disappointment is that the Canon 80D only takes a single SD card. We would have liked Canon to take from the Nikon D7xx series bodies which have had dual SD card slots for some time now.
In this Fuji X100T review I’ll talk about how I have found this camera in real World use having used it for nearly two years.
The Fuji X100T builds on the previous success of the X100 and X100s series with the same 16mp X-Trans sensor, a fixed 23mm f/2 lens (35mm equivalent focal length), aperture control ring and lots of physical dials for a rewarding range finder style shooting experience.
The Fuji 100T was announced in September 2014 and we have been using it for general shooting and travel photography since its release date.
In our Fuji X100T review we uncover the good and the bad about this popular enthusiast camera.
New to the X100T is the ability for exposure control in movies as well as 1080p video at 24, 25, 30, 50 and 60p. However more noticeable to stills photographers is the upgrading of the aperture ring on the lens to accommodate 1/3 exposure increments, the new Classic Chrome film simulation and the new hybrid viewfinder which offers both electronic and optical views and the choice to have a small overlay image of the in focus area at the bottom corner of the viewfinder.
We have had the chance to use the Fuji X100T for general travel photography in Europe and Asia, shooting some casual landscapes and some model shoots which has enabled us to get a real feel for the camera over an extended period of time. This review will give a real feel for the new features but also what it is like to live with this camera day in and day out for a long period of time.
Fuji X100T Review – Design and Handling
The Fuji X100 series of cameras offer range finder style photography and aim for simplicity when shooting. However this doesn’t mean that they are simple cameras.
In the hand the Fuji X100T feels very light and compact (in comparison to DSLR’s) yet solid enough to not feel like a plastic toy. It measures 127x74x52.4mm and weighs in at 440gm. Although quite small it is too large to be slipped in to normal size pockets but the weight is negligible if slung on your shoulder with the strap all day. Size wise it is very similar to the X-T1 although of course the X-T1’s weight can vary considerably depending upon the lens used.
Here is the Fuji X100T compared with a Nikon D7200 + 50mm f/1.4 lens
The design is elegant and aesthetically pleasing. Although this might not be important for everyone it is always appreciated by us when we get to use a camera that feels good and looks good too. It has the feel and look of a classic camera from the film era and we found that most people we encounter appreciate the design and styling. The camera is available in black and silver/black combination.
You can purchase through my Amazon UK links here at no extra cost
For US and international readers here are the Amazon.com links
We have the silver version although some street photographers prefer the black version to avoid unwanted attention. We have never found this camera to garner too much attention when street shooting though. This is mainly due to it’s small size as most people probably think it’s a cheap little compact. That’s also good if you are in a crowded place and don’t want it getting the attention of thieves.
The Fuji X100T is not weather sealed unlike the X-T1 but it feels well made with the top and bottom being of magnesium alloy construction. The hand grip on the fornt protrudes very slightly although we do find it a little small to give real confidence while holding it. However it is a light camera so it tends to nestle into the palm of your hand when shooting allowing for decent if not confidence inspiring grip.
The buttons on the back offer a clear click when pressing them, allowing for tactile feedback when shooting with your eye to the viewfinder. However they are a bit on the small side, especially the control wheel.
On the top we have the much talked about control dials. There is an exposure compensation dial offering +/-3ev. This is the one dial that could benefit from being a little stiffer in our eyes as it had quite often changed position when we took the camera out of our bag. Therefore we would recommend checking this every time you take it out of your bag.There is also a function button which by default is set up to record video although it can be customised as can 6 other fn buttons.
The Lack of an ISO dial on the X100T didn’t prove to be an issue for us.
The X100T also has a shutter speed dial with full stop increments from 1 second- 1/4000 in addition to bulb and timer mode. To make less than one stop adjustments to shutter speed you adjust the small control wheel on the top right of the rear of the camera. Lastly on the top plate we have the on off switch which can be a little awkward to quickly engage as the grip does not protrude quite far enough. It does have a thread for a shutter release cable which is a welcome addition. Note there is no ISO dial on the Fuji X100T unlike its sibling the X-T1. However in all honesty we don’t really miss it as auto ISO allows for setting minimum shutter speeds to compensate so we leave it in auto for the most part.
The rear of the camera has the viewfinder (which we shall discuss later) as well as view mode button to switch how the viewfinder/LCD screen behave when shooting. Playback button, Delete button and a further Fn button. Above and to the right of the LCD screen we have the drive mode button as well as the control dial which we mentioned earlier (used for adjusting shutter speed in 1/3 stops and can be clicked to zoom in when manually focusing).
On the right of the LCD is the AEL/AFL, Q menu and Display buttons as well as the control dial and menu buttons.
In general we like the ability to customise up to 7 of these buttons to do a whole variety of functions rather than just the default functions. For instance we set the delete button to switch the built in ND filter on and off, the up button on the control dial to turn face recognition auto focus on, right button for flash exposure compensation, down to adjust focus points and left to quickly access the different film simulations. The number of different combinations is exhaustive and allows for each user to set the camera up pretty much how they like.
The Fuji X100T has 7 customisable function buttons
On the left hand side of the body is a switch to swap between single shot, continuous and manual focusing modes.
The Fuji X100T has a Type D HDMI Micro connector, Micro USB port and a new 2.5mm microphone input; the mic input and USB port can be used with optional remote controls and the USB port can be used for charging which is great when travelling with several cameras as you can cut out the bulk of all the various different camera chargers. The Fuji X100T does of course, come with its own AC power charger.
Along with an external flash hot-shoe the Fuji X100T has an internal flash and we found it to be much better than the average in built DSLR flash at providing subtle and usable fill flash for portraits. It can be set to various modes including slow sync which is perfect for getting correctly balanced exposures with -2/3 FEC dialled in. What should also be noted is the ability of the X100T to hit flash sync speeds of up to 1/4000 thanks to its leaf shutter. This makes it easily able to shoot with fill flash in bright conditions which is a huge advantage over the X-T1 as well as all DSLR’s unless an external flash is used. We almost always use fill flash when shooting outdoor portraits with the X100T as it seems to nail the exposure and give natural results 99% of the time.
The leaf shutter allow for fast flash sync speeds and shooting at large apertures in bright light thanks to the built in ND filter.
Once you have taken a shot it is also quick and easy to transfer those files to your smart device thanks to the in built wifi of the X100T. While the Fuji app is not the best it does the job and we could transfer over full resolution Jpegs ready for upload to social media. There is an annoying limit of 30 images per transfer but this is a minor inconvenience. The app also lets you remotely control the camera although not shoot video which is a shame.
Fuji X100T Review – Viewfinder and shooting experience
The viewfinder in the Fuji X100T is clearer than the previous models. When using the optical viewfinder the X100T displays a bright and clear electronic overlay which shows, the active focus point, shooting settings such as shutter speed, ISO and aperture as well as a rectangular marker which indicates the actual area of your image corrected for parallax. Because the viewfinder and the image sensor are not in line as on a DSLR what you see straight through the viewfinder is not exactly what will be recorded on the image. This parallax correction is therefore really useful to avoid hidden surprises in your final composition and image.
The switch (left of image) is used to switch between OVF and EVF.
Flick the switch on the front of the camera and the X100T viewfinder changes to wholly electronic view. The refresh rate is fairly quick and although there is a little lag compared with an OVF we generally preferred to shoot with the EVF because it shows in real time adjustments made to the exposure before you take the shot. We just find EVFs in general a great artistic tool as you can see your image before you click the shutter. Any changes to the film simulation are reflected in the EVF so it reduces the need to chimp images after the fact. The only exception to this would be when shooting faster moving subjects which can benefit from the real time view of the OVF.
On the whole the electronic viewfinder is on par with others in the mirrorless world like the FUji X-E2s and Olympus OM-D series.
What is new on the Fuji X100T is the addition of the electronic overlay for focusing when using the optical viewfinder. When using the optical viewfinder flick the switch on the front of the camera to the left and a small rectangular electronic over lay pops up in the bottom right corner showing the in focus area. You can click the rear control dial to zoom in and now manual focusing becomes ever so easy. Add to this the manual focus aids found on the FUji X100T like focus peaking and it gives the ability to quickly and easily achieve manual focus.
In general shooting we found the X100T’s auto focus to be a notch faster than the X100s although not quite on par with the X-T1. If you are shooting portraits, landscapes and general travel photography then the auto focus in good light is quick enough to keep up.
Where we did have a few issues was when shooting moving subjects such as kids or pets. Here we found a relatively high rate of out of focus shots simply because the auto focus could not attain focus before the subject had moved on slightly. This can be frustrating but if you shoot a lot of moving subjects then it would be wise to look at other mirrorless options like the Olympus OM-D E-M1, Fuji XT-1 or Sony A6300.
The auto focus got confused here and resulted in focusing on the wrong subject.
Every time we look at the Fuji X100T it makes us want to pick it up and shoot. It’s size combined with its excellent image quality mean that we feel like taking it with us everywhere we go without worrying about the weight and size. So how about the image quality. Well lets take a look at that in more detail in the next section. Click the link below to see the results for image quality and some sample images.
The 16mp X-Trans sensor remains unchanged from that in the X100s and the same one as found in all the recent (not the new 24mp sensor found in the X-PRO2) high end X-series cameras like the XT-1 and XE-2.
The Fuji X100T image quality continues to impress although the competition has now moved on to 20mp+ as the norm so the X-Trans sensor is starting to lag behind a little bit in terms of resolution.
SOOC Jpeg shot at f/2 Click the image for the full resolution file on Flickr
The Fuji X-Trans sensor combined with the f/2 lens on the X100T are giving plenty of detail in images. We found that at f/2 things were a little less sharp with detail increasing up to f/8 before starting to decrease at f/11. Even so, Fuji’s lens modulation optimizer does help to lessen the effects of diffraction at smaller apertures.
SOOC Jpeg, f/4 1/240 ISO 200 Click the image for the full resolution file on Flickr
and 100% crop from the above image
100% crop from the centre of the same image.
SOOC Jpeg, f/4, 1/150, ISO 200, Click the image to see the full resolution file on Flickr100% Crop
In addition to the usual film simulations we now have Classic Chrome which offers a more subtle muted pallet which quickly turned in to one of our favourites for general photography. Prior to shooting Fuji we have always been in favour of shooting raw and processing the images in post in software such as Lightroom. However Fuji are just about the only cameras that we use where we don’t feel the need to shoot raw. The Jpegs straight out of camera are just so pleasing to the eye that we can spend ages editing a raw image only for us to prefer the SOOC Jpeg anyway. The only time we shoot raw with the X100T is for important shoots where we want the flexibility to edit later if we don’t quite get the results we want from the Jpeg file. You could of course shoot raw and take advantage of the X100T’s in camera raw processing to choose your film simulation etc later but we like to make these creative choices before pressing the shutter.
Provia
Velvia
Astia
Classic Chrome
Pro Neg Hi
Pro Neg STandard
Monochrome
Monochrome + Green Filter
Monochrome + Red Filter
Monochrome Yellow
Sepia
Below we have a large number of images created using the Fuji X100T . If you want to see the full resolution files along with many more shots then head over to our Flickr page.
SOOC Jpeg monochrome + Green filter
+2EV in post
No Adjustments
SOOC Jpeg Velvia
Raw conversion into B&W
f-2 ISO 640 1-125 pro neg standard
Noise performance
We still think that the performance of the X-Trans sensor is more than enough for most needs. Its 16mp sensor results in nicely detailed images and the ISO performance up to 6400 is very good. One thing to note though is that there is some talk of Fuji fudging the numbers a little in this regard and in our testing we reckon they are over estimating the ISO by 2/3 of a stop. That means that for any given ISO number stated by the X100T we should basically compare it to a Canon or Nikon at 2/3 stop lower ISO to get a fair comparison. That means that Fuji’s 6400 ISO is actually closer to 3200.
Even so the noise performance of the Fuji X100T is still decent and usable up to an indicated 6400.
Below is a SOOC Jpeg shot around sunset at ISO 1000. The image is very clean straight out of camera with just the slightest hint of noise in the shadows.
SOOC Jpeg, ISO 1000, f/5.6 1/4000
And below is a 100% crop from the same image
100% Crop
Below is a shot at 3200 ISO. These shots are straight out of camera Jpegs with no post processing done on them. You can tweak the in camera noise reduction to suit your tastes. Obviously the raw files are more noisy.
Here is a 100% crop from the same image.
Files at 3200 are still clean and retain most details. We have no hesitation shooting at ISO 3200 with the X100T.
The following image was shot at ISO 6400 and is as high as we would go if you want a usable image unless it is an emergency. Again, this is a SOOC Jpeg with standard Fuji NR applied. No post processing work was done to the image.
ISO 6400
and the 100% crop from the same image
At ISO 6400 we are seeing a loss of detail due to the in camera noise reduction being applied. Still quite usable for non professional work.
Video
Let’s be honest, if you are serious about video then you should not even be considering a Fuji. The Panasonic GH4, Sony A7 series or the new Canon 80d are where the better video-centric options lie
Even so the Fuji X100T does offer 1080 at up to 60p which gives the ability to shoot in high definition and even shoot some slow motion video too.
One of the main issue when shooting video on the X100T is the lack of image stabilisation. Given that most people will only use it for casual video, the lack of IS is a bit of a problem as it makes getting smooth pans or stable video quite difficult.
The quality of the video itself is not too bad and certainly an improvement over previous models but there are still some artifacts present and the lack of a touch or articulated LCD screen make it difficult to shoot from interesting angles. It also means that if you want to shoot video using the screen you have to hold it out in front of you which is not the most stable position. You could use the viewfinder but it just doesn’t feel right for video. In fairness to the Fuji X100T it doesn’t really set out to be a video camera so most people wont mind the issues as when required they can grab a quick HD video.
The below video was shot at 1080 24p and show some of the artifacts on the petrol tank of the green motorbike that we mentioned previously
The following video, again shot at 1080 24p shows some effects of moire on the headlight of the near scooter.
Having used the Fuji X100T for nearly 2 years we are well placed to give a real world opinion on what it is like to use day in and day out. We have traveled with it all over the World and in that time have really put it through its paces.
The Fuji X100T is aimed quite clearly at photographers who enjoy the simplicity of photography but don’t want to compromise on image quality. In this respect it it is a very good camera. We like the design and look of the X100T.
Using an aperture ring on a small range finder style camera feels very natural and combined with the shutter speed dial and other physical controls it creates a very pleasing tool which gets out of the way and just lets you shoot.
When coming from DSLR’s the Fuji controls can seem a little small. For example when first shooting this camera we noticed that it was a little difficult to get purchase on the aperture ring to quickly adjust it. Maybe that was just our clumsy fingers as after some use our hands and muscle memory adjusted and now we don’t find it difficult at all.
Even after all this time though we still don’t find the FUji X100T to be a camera that we can quickly adjust the settings of while having our eye up to the viewfinder. Want to change ISO, white balance, enable the ND filter then we almost always find ourselves doing so on the LCD screen with the camera away from our eye. This means that we don’t feel it is natural to quickly change settings on the fly while shooting.
However other items that are perhaps more regularly changed like moving the focus point and changing film simulations can be quite quickly controlled via the D-pad custom functions and in fairness to Fuji they have made this camera very customisable so you can set it up so that your most used functions are where you want.
The shutter speed and exposure compensation dial are definitely ones which we change before or while bringing the camera up to our eye. We just find we want to physically check the settings before shooting. However it is nice to be able to set these while scouting potential shots before being immersed in the viewfinder. If we know we are going to be shooting people or faster moving subjects we can set the shutter speed accordingly and then adjust aperture as required when framing the shot.
The image quality is very good, offering sharp images from f/2.8 on-wards and although you lose some detail when shooting the lens open at f/2 we still generally liked the image quality that we were getting. High ISO performance is very good (with the proviso that Fuji ISO numbers may be fudged somewhat). Up to and including ISO 3200 files are very clean. ISO 6400 is usable.
SOOC Jpegs from Fuji are amongst the best in the industry
We believe the in-camera Jpegs from Fuji are the best in the industry and the film simulations modes are very pleasing. The new Classic Chrome gives a very appealing muted palette which suits a wide range of imagery. We often find that we just shoot Jpegs with Fuji cameras as combined with the ‘what you see is what you get’ element of an electronic viewfinder there is very little need for chimping after the exposure and the quality of the Jpegs produced is excellent.
What we really love about using the X100T for general photography is that it is a camera that can shoot in virtually any light. It’s main advantages over the competition are its leaf shutter. This makes the Fuji quiet in use but more importantly it gives much faster flash sync speeds than the typical 1/250 or less of most other cameras. This allows you to take shots with flash in full sunlight at fast shutter speeds without issue. Combine this with a built in ND filter and it means that we can use large apertures and create images with that beautiful shallow depth of field without having to add an ND filter to the lens. All this while still being able to add a touch of fill flash thanks to the faster flash sync speed.
Don’t forget there is an electronic shutter too which goes up to 1/32000 of a second although the flash wont fire when using the electronic shutter.
The fast sync speed enables use of fill flash at large apetures
This allows you to go out with just the camera and nothing more and know that you can create the look in your images that you want without having to carry loads of kit. That is exactly the simplicity that we desire when carrying a small and light camera.
For street and general travel photography, if you are happy with the focal length of 23mm (35mm Full frame equivalent) then it is certainly one of the most enjoyable cameras to use. Some may feel limited by the lack of ability to change lenses but after nearly 2 years of use we feel it is actually quite liberating.
No longer are you constantly asking yourself which lens to put on the camera, as you simply focus on what you have and learn to use it to the best of your ability.
Pros
Image quality up to ISO 3200 is very good
Leaf shutter allows for fast flash sync speeds
In built ND filter allows you to shoot shallow depth of field shots even in bright light
Out of camera Jpegs are beautiful
Excellent flash exposure for fill light in portraits
Electronic shutter allows up to 1/32000 shutter speeds
Aperture ring on the lens is intuitive to use
Small size and light weight means that you take this camera with you everywhere
Very customisable with 7Fn buttons
Cons
Auto Focus is not as good as other mirrorless cameras like the Fuji X-T1, Olympus OM-D E-M1 and Sony A6300 and nowhere near a modern similarly priced DSLR
Auto Focus can hunt in poor light
Tracking Auto Focus is abysmal
Shutter Dial would benefit from a lock and Exposure compensation dial needs to be stiffer to avoid being accidentally changed
Not actually much smaller than an X-T1 with 27mm pancake lens and not quite small enough to go in a standard pocket
Poor battery performance (average around 300 shots per battery) You need at least 2 for a days shooting, probably 3.
16mp sensor is lacking resolution compared with the competition
Did we mention the auto focus
Recommendations
So would we recommend the Fuji X100T to other photographers?
Yes we would because this camera possibly more than any other makes you want to get out and take pictures and that is a great quality. When you do you wont be disappointed with the quality of the images you get thanks to the X-Trans sensor and f/2 lens.
However we would add a few words of caution because this camera is quite a niche tool in our opinion. If you shoot fast subjects, like to change lenses, crop heavily in post or just want a do everything camera then you should probably look elsewhere.
The Fuji X-100T feels like a camera built for purists that enjoy its simplicity of control, fixed lens and beautiful image quality. It feels like a camera for creating images with rather than for snapping pics of your holiday as record shots. Used in the right way it can produce fantastic results but if you just want a general camera to snap away with then auto focus performance and lack of zoom lens might leave you disappointed as for considerably less money you could get a decent entry level DSLR and kit lens which would better serve that purpose.
In an ideal world the Fuji X100T would probably be your second camera to work along side an interchangeable lens camera.
Landscape Photographers– In our opinion Nothing beats a DSLR like the Nikon D810 or Canon 5Ds due to the image quality, build quality and available lens choice. Mid range DSLR’s like the Canon 80D and D7200 also offer a a lot of these benefits at a cheaper price than their full frame alternatives.
Sports and wildlife– Nikon D500, D5 or Canon 7d mkII or 1DXII- Take a look at our Canon 7d mkII and Nikon D500 (coming soon) reviews.
We have been testing out the new Canon 7d Mark 2 for a few weeks now to put it through its paces and to see if it lives up to the 7D name.
The things that interest us most on this new camera are the new 65 point auto-focus system which is borrowed from the top of the range Canon 1DX and how the camera performs at high ISO settings.
The original Canon 7D is a bit long in the tooth now and a lot of photographers find that they are limited to using ISO 400 or below to get the image quality that they are happy with.
By looking at who the 7d mk 2 is aimed at we can start to test out the relevant features to enable you to see if it is a worthy upgrade and if it will allow you to capture the images that you need.
The Canon 7d mark 2 is squarely aimed at wildlife, sports and photojournalists where excellent tracking, fast FPS and the extra reach of Canon’s APS-C sensor all help to get the shots that nothing else under £3000 will get you.
A quick look at the specs and the body tell us that this camera has a level of weather sealing that is not found on any camera body below the top of the range 1DX and Nikon D4s. There are seals and gaskets covering every possible weak point as far as dust and water are concerned and indeed in our testing we have found that the camera handles torrential rain in its stride. The weather sealing is top notch so have no fear in taking this body on safari, to the Arctic or using it in terrible conditions. It will keep going all day long.
In terms of ergonomics the 7d mark 2 is very similar to the original 7d. If you have previously used that camera or any of Canon’s higher end models then you will have no problem whatsoever switching to the new 7d mark 2.
What the 7d mark 2 does have now is a dedicated auto focus switch that allows you to quickly and easily flick through the auto focus settings. It is located around the joystick control. Here’s how it works. You press the auto focus selection button, then you can flick the selector switch to change between single point AF, group AF and 65 point AF selection. You can then press the joystick in whichever direction you choose to specify which af point or group you wish to use.This allows you to quickly and easily change your auto focus mode to suit the intended target. I personally found this to be a really intuitive system to use and I have been shooting Nikon bodies for the last few years.
So how does it work in practise? Is the AF system as good as they say?
In short, yes. A big resounding yes!
We have tested the Canon 7D Mark 2 out on a huge variety of subjects from stationary portraits through to erratically moving birds in flight and found that the new 65 point auto focus system gives you an incredibly high rate of keepers. This is coming from someone who can remember trying to shoot birds in flight on a Canon 40d many years back and all the frustrations that involved.
However this is by far and away the most responsive, accurate and customisable auto-focus system that I have used on any camera now with the exception of the 1DX but that camera is way more expensive.
Below I shot a series of images of oncoming motorbikes travelling around 40-60mph. The camera was set to AI servo (tracking af), high speed burst and the centre group of AF points.It was recording both raw and jpeg files.
I started with the camera at my side and raised it to my eye before firing off a burst. Out of 32 shots only 2 were out of focus and to be honest that could well have been user error.
What also impresses me with this camera is the depth of the buffer. With jpegs you can shoot all day long and with a fast card not fill the buffer. We are able to shoot 18 raw files before the camera slows down. That is shooting on a Sandisk Extreme 32gb 120/mbs compact flash card.
If you head over to Cotswold Cameras TV channel you can see a quick clip of the canon firing off a burst of jpegs. Not only does this kind of shooting rate make you feel all warm inside, it’s also great for capturing action where a slower camera might miss the critical shot.
ISO performance
We have shot a bunch of different shots at all ISO settings and while the 7d mk2 might not quite be up to par with the full frame sensors in the Nikon d750 and D810 in terms of high ISO performance it is certainly no slouch. We think the ISO performance of this crop sensor is definitely the best we have yet seen from this size of sensor. ISO 1600 is clean, at ISO 3200 there is a small amount of noise creeping it but it is not at all objectionable and even at ISO 6400 noise is incredibly well-controlled. We are talking about unedited raw files that have had no noise reduction whatsoever applied. Now just think about how good they will look if you use Lightroom’s noise reduction capabilities on them.
The shots below are straight raw to jpeg conversions using Canon’s DPP software. They suffer a little from the jpeg conversion and show some jpeg artifacts due to file size restrictions, so to see the high resolution versions please head to our Flickr page.
ISO 100 CropISO 800 CropISO 3200 CropISO 16000 Crop
Even at ISO 16000 you are still getting plenty of detail and the noise levels are manageable. We are really impressed with what Canon has done with this sensor in terms of noise performance and we think you will be too. But of course you don’t just need to take our word for it as we have shot some sample images which you can see below. We also have the full resolution files available on Flickr for you to download so you can have a play around with them and see for yourself.
Is the 7d mk 2 just for wildlife and sports photographers?
While the Canon 7d mark 2 is undoubtedly a fantastic camera for wildlife and sports it is not just a one trick pony. With the excellent 20mp sensor along with in-camera HDR and the ability to capture time lapse images it is also a great camera for landscapes and general photography. The auto focus makes getting sharp images, no matter what the subject easy and intuitive.
In camera HDR shot with the 7d mk 2
We get to test and play with a lot of cameras here at The Cotswold Photographer but the new Canon 7d Mark 2 is something that we are really excited about. It allows photographers to access the very best auto focus system available, an excellent 10 FPS shooting speed with a deep buffer and all at a price point that was previously unthinkable.
We recently put the new Sony A7 mk II through its paces to see what it was capable of and if this is the perfect mirrorless camera.
There is no doubt that Sony is storming the mirrorless world in the last year with its A series of mirrorless cameras. We have the megapixel monster the A7R, the general use A7 and the low light performer A7S.
Now only a year after the first round of releases Sony has updated the A7 with the new A7 mk II.
So what’s new?
Well the headline feature and the one we want to get straight to is the 5 axis in body image stabilisation system that Sony have put in the A7 II. Sony are claiming it will provide up to 4.5 stops of compensation.
It is quite a feat of engineering to fit in body IS into a body this small with such a a large sensor and given the A series popularity for mounting adapted prime lenses, one that is sure to excite a lot of photographers. We’ll get to how good it is shortly.
Other notable changes include a deeper grip with re-positioned shutter button, a new finger dial, more solid construction, improved AF performance and the ability to record video in XAVC S format at upto 50mb/sec.
Same name new design
Although the Sony A7 II shares its name with the A7, Sony have changed the feel of the new mk II in a number of ways. The mk II feels substantially heavier than the original A7 at 599 grams with battery compared to 494g for the A7. It is also 2mm taller and 10mm thicker, thanks largely due to the new deeper grip and more metal used in its construction.
Although the Sony A7 II feels heavier than the previous model we actually prefer it thanks to the improved grip which is deeper and gives a better hold on the camera. It makes it much nicer to carry around in one hand without the fear of it slipping out of your hand. It also offers a better feel when combined with any larger lenses.
One small change that has resulted in a marked improvement is the new position of the shutter button which has moved from the rather awkward position on top of the body on the A7 to the new position which is now on the grip and angled slightly forward. This offers a much more natural shooting position and makes it quicker and more comfortable to press.
Size comparison of Sony A7 II (left) , Fuji X-T1 and Fuji X100T (right) all sporting their 35mm equivalent lenses.
Let’s get down to shooting
Image quality is virtually identical to the A7 as Sony has stuck with the same 24mp full frame sensor used in the original A7. No complaints here really about image quality as you are getting wonderful clarity and contrast, good if not great low light performance and plenty of resolution alongside Full frame formats ability to isolate subjects with shallow depth of field.
Shot with the Sony A7 II + Zeiss 55mm at f/1.8
If we were going to pick fault with image quality it would be that the Nikon D750 seems to eek out better high ISo performance from the same sensor and Sony still does not offer lossless Raw files which can result in slightly poorer quality files which are not able to be pushed quite as far in post processing as those of the D750. However, this is nitpicking and to most the images that the Sony A7 II can produce will be more than enough. We would also mention that despite some complaints on the internet about Sony Jpegs we cannot fault the colours that this camera is capable of producing, they are rich, contrasty and beautiful in our opinion.
Shot on Sony A7 II + Zeiss FE 35mm @f/4
So just how good is the new image stabilisation and does it work with Leica/Zeiss/Canon/Nikon primes?
This is the first full frame mirrorless camera with in body Image Stabilisation. In theory this will give all the benefits of a full frame sensor and stabilise any lens attached to the camera. The possibilities for low light shooting are incredible with these two technologies working together.
When you shoot non stabilised lenses on the Sony A7 II the image in the viewfinder is now stabilised too and this not only allows precise and steady framing it also makes manually focussing using magnified view possible. Without IS it can be difficult to handhold the camera steady enough to manually focus effectively but with the stabilised image this is now a breeze.
During testing we found that the IS combined with the Zeiss FE35mm 2.8 and the Zeiss FE 55mm 1.8 primes worked very well.
We were able to shoot handheld shots with the FE 55mm 1.8 and 35mm f/2.8 at shutter speeds slow as 0.5 seconds and still get sharp shots.
Overall performance
Overall the addition of in body image stabilisation to the Sony A7 II is a ground breaking advancement in the technology. It allows photographers to create incredible full frame shots at previously unthinkable shutter speeds. It transforms the usability of this camera when combined with manual focus primes and for static subjects enables incredible low light performance. Combine the High ISo performance of a full frame sensor with the image stabilisation of the Sony A7 II alongside a bright prime and you can virtually shoot in the dark.
There are a few niggles to be aware of with the Sony A7 mk II and indeed all of the Sony A series bodies.
We found that for street shooting the start up time from sleep mode was a little slow and could result in missed shots. While auto-focus is improved from the original A7 it can still hunt a little during low light.
Button placement and general ergonomics are not as good as some such as the Fuji X-T1. When you shoot lots of different cameras as we do some just feel like they were built by photographers and some feel like they were built by engineers. The Sony is definitely in the latter camp. We found the placement of the zoom button a little unusual and the menu system still takes some getting used to. However overall there really is not much to complain about .
The Fuji X-T1 (centre) feels a little more intuitive to use than the Sony A7 II (far side).
If you want the best image quality in a small package then the Sony A7 II deserves serious consideration.